
Spooky Peanut Butter Spider Cookies | Easy Halloween Treat Recipe
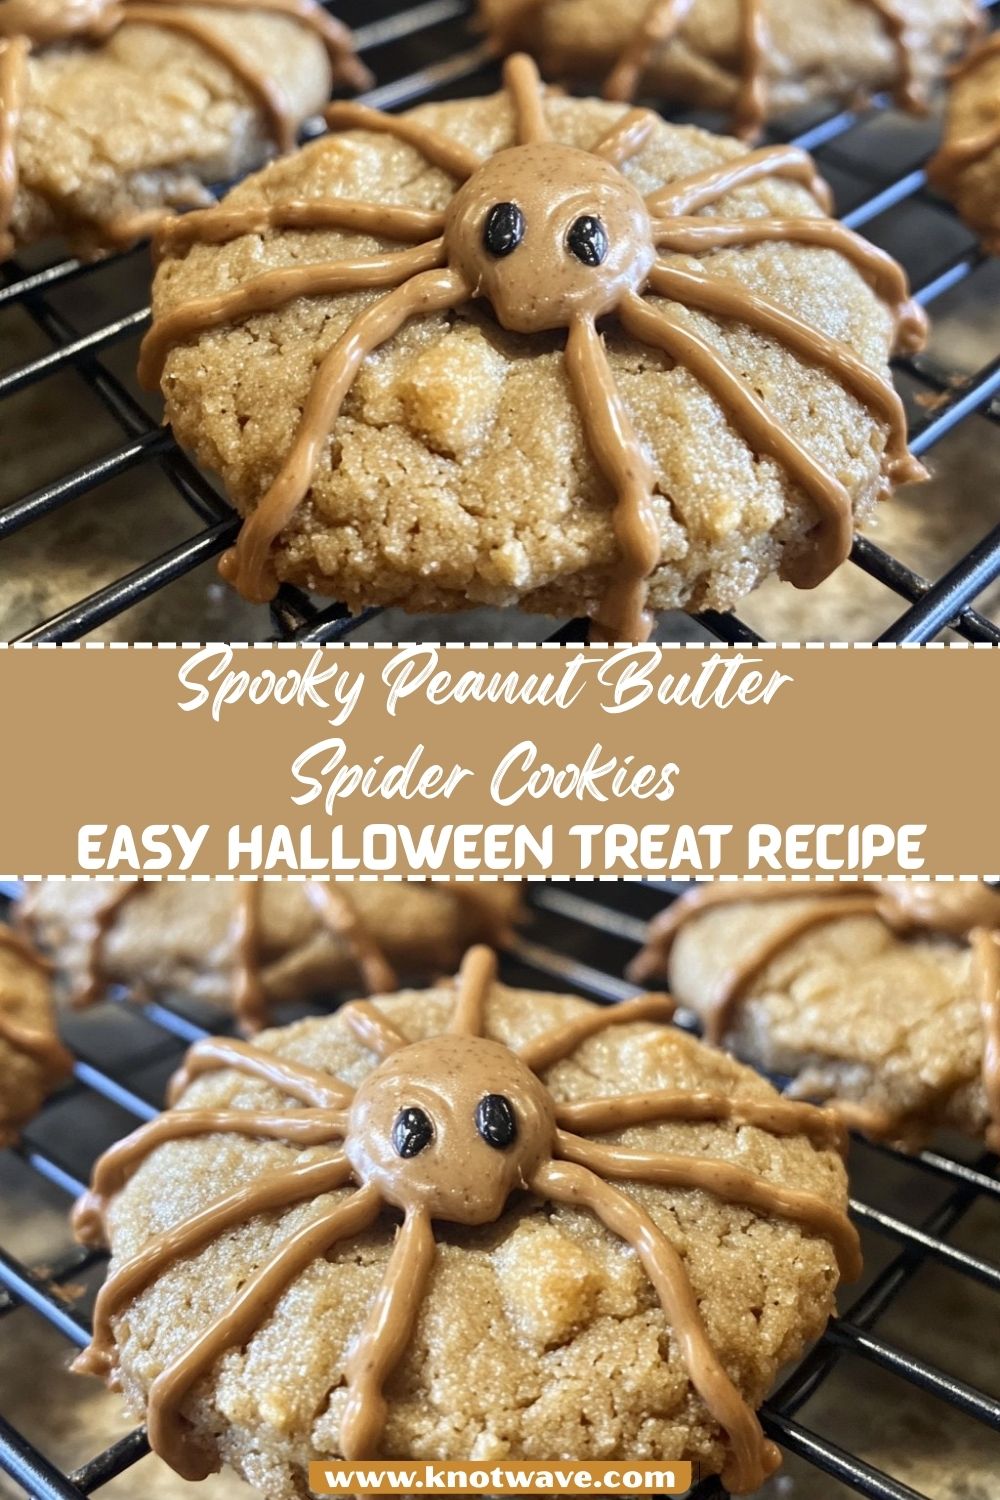
Halloween is all about spooky fun, and nothing sets the mood better than themed treats. These Spooky Peanut Butter Spider Cookies are not only adorable but also incredibly delicious. Imagine chewy peanut butter cookies topped with chocolate spider bodies and licorice legs creepy enough to wow your guests yet tasty enough to disappear in minutes.
This easy recipe transforms simple homemade cookies into a showstopping Halloween snack. With our step by step cooking guide, you’ll learn how to prepare the cookie dough, bake them to golden perfection, and decorate them like little edible spiders. Perfect for Halloween parties, trick-or-treat platters, or even as a fun family baking project.
Why You’ll Love This Recipe
These spider cookies are the ultimate combination of playful presentation and comforting flavors. The chewy peanut butter base is rich, nutty, and slightly salty, perfectly balanced by a chocolatey topping. Add some candy eyes, and you’ve got a treat that’s both spooky and cute.
Here’s why this recipe is worth bookmarking:
-
Kid-friendly & fun: Children will love helping with the decorating.
-
Simple ingredients: Uses pantry staples you likely already have.
-
Versatile presentation: Works as a centerpiece for parties or individually wrapped favors.
-
Stress-free baking: No advanced skills required; anyone can follow the steps.
From the first bite, you’ll realize these aren’t just novelty cookies they’re genuinely delicious, making them a recipe you’ll want to repeat every Halloween.
What Makes It Healthy & Special
While they’re a festive treat, these cookies can be made healthier with a few easy swaps. Peanut butter provides protein and healthy fats, and using natural sweeteners or whole-grain flour can lighten the load without sacrificing taste.
What sets these cookies apart:
-
No artificial dyes needed: Decoration is done with natural chocolate and simple candy.
-
Portion-friendly: Small cookies make for a balanced indulgence.
-
Homemade goodness: Skip store-bought packaged cookies for a fresh, preservative-free option.
-
Customizable: Easily adaptable for gluten-free, nut-free, or vegan diets.
In short, you get all the Halloween fun with better-quality ingredients and homemade charm.
Ingredients
For the Cookie Dough
-
1 cup (250 g) creamy peanut butter (or almond butter for nut-free alternative)
-
½ cup (100 g) granulated sugar (or coconut sugar)
-
½ cup (100 g) brown sugar (or jaggery powder)
-
1 large egg
-
1 tsp vanilla extract
-
1 tsp baking soda
-
1 ¼ cups (150 g) all-purpose flour (or whole wheat flour)
-
¼ tsp salt
For Decoration (Spider Bodies & Legs)
-
12–16 round chocolate truffles (e.g., Lindt, Ferrero Rocher, or homemade)
-
Melted chocolate or chocolate chips (100 g / 3.5 oz)
-
Black licorice strings (cut into thin strips for legs)
-
Candy eyes (store-bought or homemade with icing sugar)
Optional Add-ins
-
A sprinkle of cocoa powder in dough for extra chocolatey flavor.
-
Sea salt flakes on top for a sweet-salty twist.
Instructions / Method
Preparing the Cookie Dough
-
Preheat oven to 180°C (350°F) and line a baking sheet with parchment paper.
-
In a large bowl, cream peanut butter, granulated sugar, and brown sugar using a hand mixer until light and fluffy (about 2-3 minutes).
-
Add egg and vanilla extract. Beat until fully combined.
-
In a separate bowl, whisk flour, baking soda, and salt.
-
Gradually fold dry ingredients into the wet mixture until dough forms. Pro Tip: Do not overmix; stop as soon as flour disappears.
Baking the Cookies
-
Scoop dough into 1 tablespoon-sized balls (about 25 g each) and place on baking sheet 2 inches (5 cm) apart.
-
Press lightly to flatten. Bake for 9-11 minutes until edges are set but centers are still soft.
-
Remove from oven. Immediately press the center gently with the back of a spoon to create a shallow well for spider bodies.
-
Allow cookies to cool for 10 minutes on the tray, then transfer to a cooling rack.
Making the Peanut Butter Base
-
Once cookies are slightly cooled but still warm, drop a tiny dollop of melted chocolate into the well.
-
Press a chocolate truffle onto each cookie, securing it as the “spider body.”
Decorating the Spider Cookies
-
Use melted chocolate in a piping bag to attach candy eyes to the truffle.
-
Insert 4 licorice strips on each side of the truffle to create 8 spider legs.
-
For a glossy finish, drizzle extra melted chocolate around the “legs.”
-
Let cookies sit for 15-20 minutes until decorations are set.
Tips and Tricks for the Perfect Halloween Treat
-
Cool slightly before decorating: too hot and chocolate will melt off.
-
Uniform size matters: roll dough evenly for consistent baking.
-
Licorice too soft? Chill briefly in the fridge before inserting into cookies.
Troubleshooting
-
Cookies too crumbly? Dough too dry → add 1 tbsp milk.
-
Cookies spreading too much? Dough too warm → chill for 20 minutes before baking.
-
Chocolate not sticking? Roughen truffle base slightly or use more melted chocolate as glue.
Storage and Reheating
-
Store decorated cookies in an airtight container at room temp for 3-4 days.
-
Refrigerate for up to 1 week (but allow to sit at room temp before serving).
-
Freeze plain cookies (without decoration) for up to 2 months.
Recipe Information Box
-
Prep Time: 20 minutes
-
Cook Time: 10 minutes
-
Total Time: 30 minutes
-
Servings: 12-16 cookies
-
Cuisine: American / Festive Halloween
Notes / Tips
Variations
-
Gluten-free: Use oat flour or almond flour.
-
Vegan: Replace egg with flax egg; use vegan truffles.
-
Nut-free: Use sunflower seed butter instead of peanut butter.
Substitutions
-
Peanut butter → almond, cashew, or sunflower butter.
-
Chocolate truffles → mini peanut butter cups.
-
Licorice legs → pretzel sticks dipped in chocolate.
Make-Ahead & Storage
-
Bake cookies a day ahead and decorate before serving.
-
Freeze undecorated cookies, thaw, then add spiders fresh.
Troubleshooting & Common Mistakes
-
Overbaking: Cookies harden quickly if left too long; remove while soft.
-
Sticky decorations: Let chocolate set properly before stacking cookies.
Tools & Equipment
-
Baking sheet + parchment paper
-
Hand mixer or stand mixer
-
Cooling rack
-
Piping bag (or small ziplock bag with tip cut off)
Serving Ideas
-
Display on a Halloween-themed platter with cobweb décor.
-
Pack in clear treat bags for trick-or-treat giveaways.
-
Pair with hot chocolate or spiced cider for cozy vibes.
Nutritional Information (per cookie, approx.)
-
Calories: 190
-
Carbs: 22 g
-
Protein: 5 g
-
Fat: 10 g
-
Fiber: 2 g
-
Sodium: 95 mg
Conclusion
These Spooky Peanut Butter Spider Cookies prove that Halloween baking can be both playful and delicious. With their chewy base, chocolatey bodies, and fun decorations, they’re sure to be the highlight of any spooky spread.

Spooky Peanut Butter Spider Cookies | Easy Halloween Treat Recipe
Ingredients
Method
- Preparing the Cookie Dough
- Preheat oven to 180°C (350°F) and line a baking sheet with parchment paper.
- In a large bowl, cream peanut butter, granulated sugar, and brown sugar using a hand mixer until light and fluffy (about 2-3 minutes).
- Add egg and vanilla extract. Beat until fully combined.
- In a separate bowl, whisk flour, baking soda, and salt.
- Gradually fold dry ingredients into the wet mixture until dough forms. Pro Tip: Do not overmix; stop as soon as flour disappears.
- Baking the Cookies
- Scoop dough into 1 tablespoon-sized balls (about 25 g each) and place on baking sheet 2 inches (5 cm) apart.
- Press lightly to flatten. Bake for 9-11 minutes until edges are set but centers are still soft.
- Remove from oven. Immediately press the center gently with the back of a spoon to create a shallow well for spider bodies.
- Allow cookies to cool for 10 minutes on the tray, then transfer to a cooling rack.
- Making the Peanut Butter Base
- Once cookies are slightly cooled but still warm, drop a tiny dollop of melted chocolate into the well.
- Press a chocolate truffle onto each cookie, securing it as the “spider body.”
- Decorating the Spider Cookies
- Use melted chocolate in a piping bag to attach candy eyes to the truffle.
- Insert 4 licorice strips on each side of the truffle to create 8 spider legs.
- For a glossy finish, drizzle extra melted chocolate around the “legs.”
- Let cookies sit for 15-20 minutes until decorations are set.
- Tips and Tricks for the Perfect Halloween Treat
- Cool slightly before decorating: too hot and chocolate will melt off.
- Uniform size matters: roll dough evenly for consistent baking.
- Licorice too soft? Chill briefly in the fridge before inserting into cookies.
- Troubleshooting
- Cookies too crumbly? Dough too dry → add 1 tbsp milk.
- Cookies spreading too much? Dough too warm → chill for 20 minutes before baking.
- Chocolate not sticking? Roughen truffle base slightly or use more melted chocolate as glue.
- Storage and Reheating
- Store decorated cookies in an airtight container at room temp for 3-4 days.
- Refrigerate for up to 1 week (but allow to sit at room temp before serving).
- Freeze plain cookies (without decoration) for up to 2 months.
Notes
Variations
- Gluten-free: Use oat flour or almond flour.
- Vegan: Replace egg with flax egg; use vegan truffles.
- Nut-free: Use sunflower seed butter instead of peanut butter.
Substitutions
- Peanut butter → almond, cashew, or sunflower butter.
- Chocolate truffles → mini peanut butter cups.
- Licorice legs → pretzel sticks dipped in chocolate.
Make-Ahead & Storage
- Bake cookies a day ahead and decorate before serving.
- Freeze undecorated cookies, thaw, then add spiders fresh.
Troubleshooting & Common Mistakes
- Overbaking: Cookies harden quickly if left too long; remove while soft.
- Sticky decorations: Let chocolate set properly before stacking cookies.
Tools & Equipment
- Baking sheet + parchment paper
- Hand mixer or stand mixer
- Cooling rack
- Piping bag (or small ziplock bag with tip cut off)
Serving Ideas
- Display on a Halloween-themed platter with cobweb décor.
- Pack in clear treat bags for trick-or-treat giveaways.
- Pair with hot chocolate or spiced cider for cozy vibes.