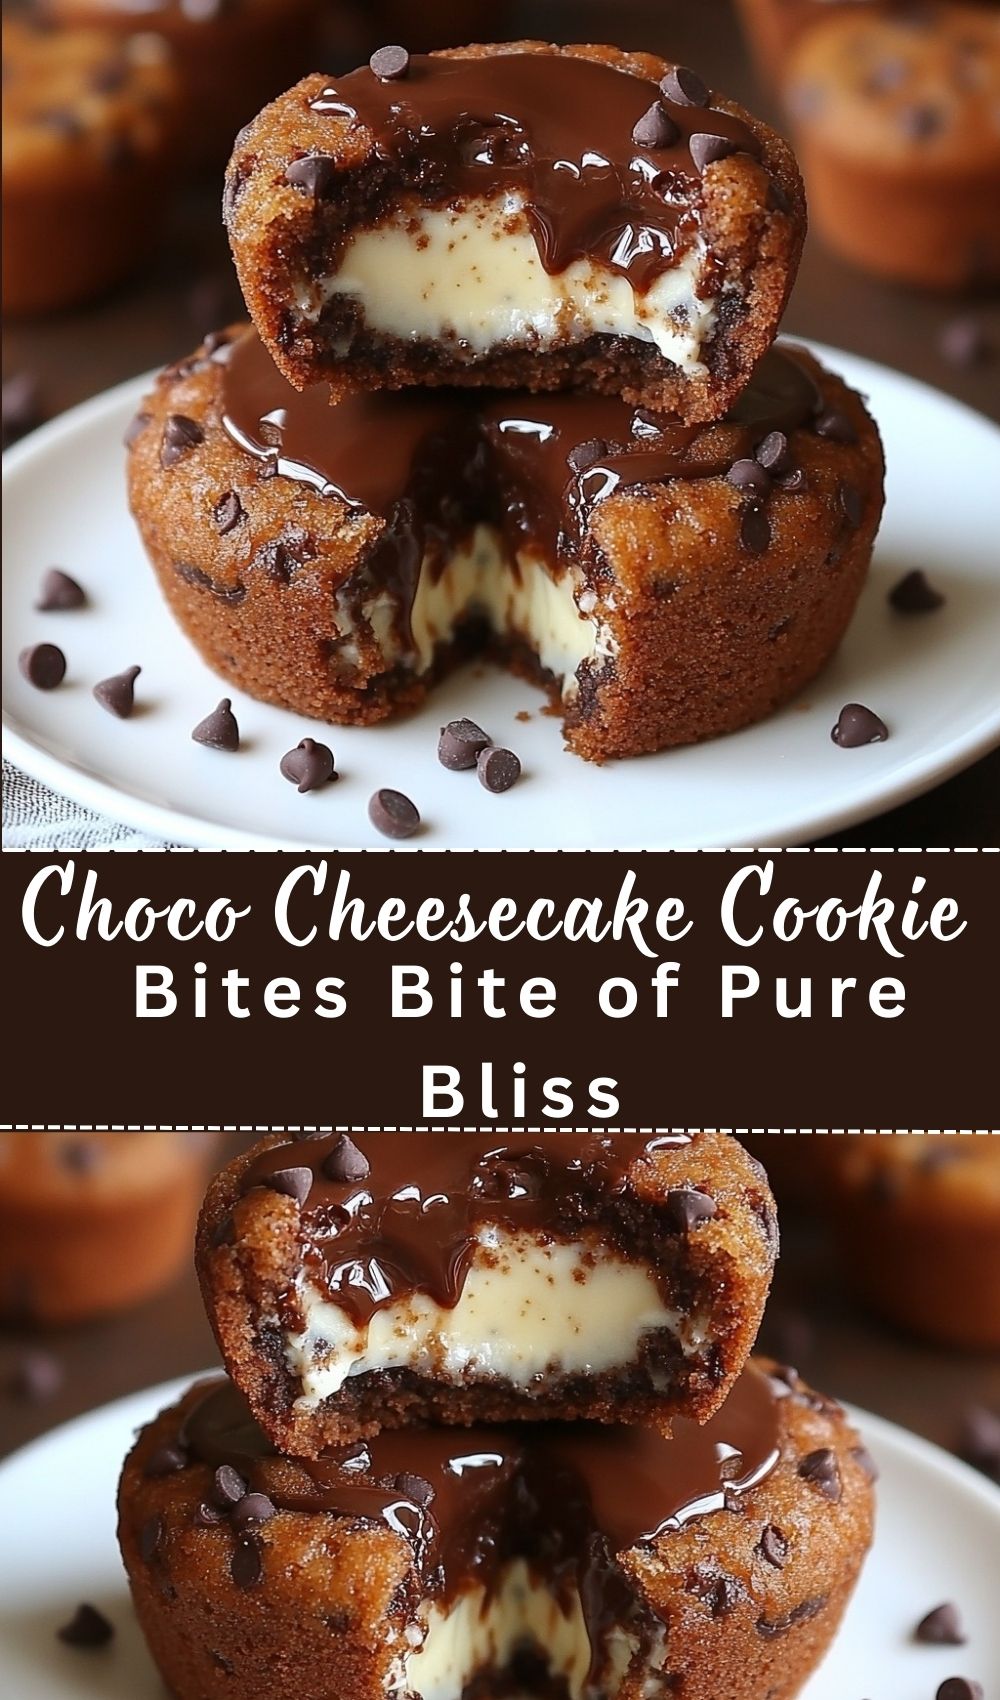
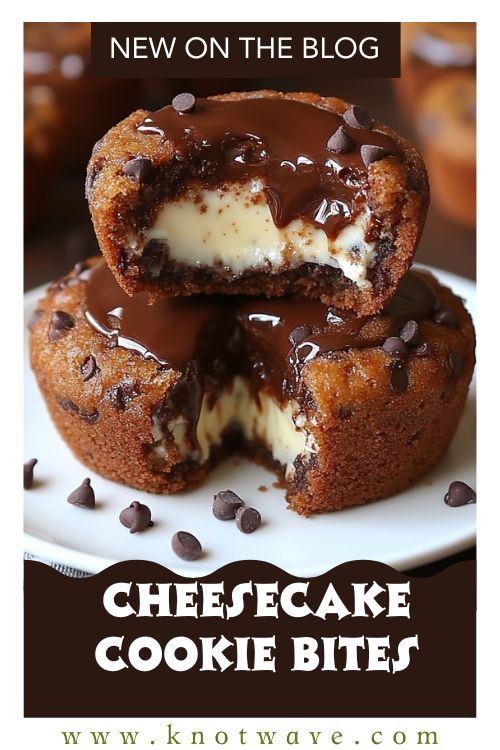
Choco Cheesecake Cookie Bites Bite of Pure Bliss
There’s something universally comforting about desserts that fit right in the palm of your hand. Like the nostalgic joy of grabbing a warm cookie straight off the tray or sneaking a mini cheesecake from the fridge when no one’s watching. These Choco Cheesecake Cookie Bites combine the best of both worlds: the richness of chocolate, the silk of cheesecake, and the snap of glossy coating all wrapped into a perfect two-bite treat.
Imagine this: buttery cocoa cookie shells baked to tender crispness, each one cradling a spoonful of vanilla-kissed cheesecake filling. The aroma of melting butter and cocoa dances through the kitchen, and once cooled, each bite is dipped in dark, shiny chocolate that hardens into a smooth shell. One crunch, one melt, one sigh it’s the kind of dessert that stops time for a second.
These bites are snackable, shareable, box-ready treats the kind you can pile into jars, gift boxes, or dessert platters. They look boutique but are surprisingly easy to make at home with a few pro tricks.
What makes them iconic? It’s the balance a buttery base with crisp edges, a tangy, creamy cheesecake heart, and a deep chocolate finish that shatters delicately between your teeth. Sweet, rich, and balanced with just the right touch of salt.
And the secret to perfection? A double set” method bake, chill, and dip. The first bake sets structure; the chill firms the filling; the final dip seals the magic. In this guide, you’ll learn how to cream butter like a pro, chill dough for sharp edges, temper chocolate or use the quick-microwave hack, and store your bites for weeks without losing their shine. Ready? Let’s bake pure bliss.
Background Story
Growing up, bakery trips were my small pockets of happiness. I’d walk in with wide eyes, staring at trays lined with mini cheesecakes, brownie bites, and frosted cookies, all tiny yet luxurious. I never wanted a slice of cake I wanted a bite-sized wonder that made me feel like I had my own secret treat.
Years later, I started recreating that magic in my own kitchen. One day, while making chocolate cookies, I pressed one into a muffin tin out of curiosity a perfect little cup. It reminded me of those bakery cheesecakes, and soon, a creamy vanilla filling found its home inside. A drizzle of chocolate later, and the first batch of Choco Cheesecake Cookie Bites was born.
Making them at home means freshness, creativity, and joy. You can tweak sweetness, swap chocolates, or add espresso for sophistication. And the best part? They store beautifully, making them ideal for gifting, holidays, or anytime your heart craves something sweet but manageable a dessert that feels both indulgent and personal.
Recipe Information
| Category | Detail |
|---|---|
| Prep Time | 25 minutes |
| Chill/Rest Time | 30–60 minutes (dough + filled cups) |
| Cook/Bake Time | 10–14 minutes (cookie cups) + 2–3 minutes optional post-bake set |
| Total Time | 1 hour 15 minutes – 1 hour 45 minutes |
| Difficulty | Easy–Intermediate |
| Servings | 24–30 bites (mini muffin pan) |
| Best For | Parties, lunchbox treats, gifting, tea/coffee breaks |
| Cuisine | American bakery-style |
| Course | Dessert / Snack |
| Diet | Vegetarian (contains dairy/egg) |
Ingredients (with Notes)
For the Cocoa Cookie Cups
-
Unsalted Butter (room temp) The foundation of flavor; provides a tender crumb and melts into that signature cocoa aroma.
-
Granulated Sugar + Light Brown Sugar Sweetness with depth; brown sugar adds chew and moisture.
-
Egg (room temp) Binds and stabilizes for structure.
-
Vanilla Extract Adds warmth and a bakery-style fragrance.
-
All-Purpose Flour The backbone of the dough, giving shape and texture.
-
Unsweetened Cocoa Powder (natural or Dutch-process) The soul of the recipe; Dutch cocoa gives darker, richer tones.
-
Baking Powder + Pinch of Baking Soda Subtle lift without puffing too much; keeps cups sturdy.
-
Salt – Balances sweetness and sharpens chocolate flavor.
For the Cheesecake Filling
-
Full-Fat Cream Cheese (room temp) Smooth, creamy base that holds shape once chilled.
-
Powdered Sugar Dissolves easily for a silky texture.
-
Sour Cream or Greek Yogurt Adds tang and a luscious mouthfeel.
-
Vanilla Extract Classic cheesecake flavor depth.
-
Egg Yolk (optional) For a baked version with firmer texture.
Chocolate Finish
-
Dark or Semi-Sweet Chocolate Creates that signature snap and bittersweet contrast.
-
Neutral Oil or Cocoa Butter (1–2 tsp) Ensures a glossy, easy-dipping consistency.
-
Flaky Sea Salt or Sprinkles (optional) Adds texture, contrast, and charm.
Optional Flavor Boosts
-
Espresso Powder Intensifies chocolate.
-
Orange Zest Adds brightness.
-
Crushed Nuts or Cookies For a surprise crunch in every bite.
Step-by-Step Instructions
1. Bring Dairy to Room Temperature
Set cream cheese, butter, and egg out for 30–60 minutes. Soft ingredients blend seamlessly no lumps, no curdling, just silky smoothness.
2. Make the Cocoa Cookie Dough
Cream together butter, granulated sugar, and brown sugar until light and fluffy (2–3 minutes). This aerates the dough and builds structure.
Add egg and vanilla, beating until fully incorporated.
In another bowl, whisk flour, cocoa powder, baking powder, baking soda, and salt.
Gradually combine dry with wet just until the flour disappears. The dough should be soft but not sticky.
Chill for 20–30 minutes for crisp edges and controlled spread.
3. Form the Cookie Cups
Preheat oven to 350°F (175°C).
Grease or butter a mini muffin pan. Scoop 1 tablespoon of dough per cup and press it to form a shell, leaving a small cavity in the center.
A mini tart press or the back of a teaspoon works great.
4. First Bake The Low Fry Moment
Bake for 8–10 minutes, just until the edges are set and tops look matte.
Immediately re-press the centers gently (use a spoon or tamper) to maintain the cup shape this prevents shallow wells later.
Let cool slightly while you make the filling.
5. Make the Cheesecake Filling
In a clean bowl, beat cream cheese until fluffy. Add powdered sugar and continue beating until smooth.
Blend in sour cream (or yogurt) and vanilla extract for that creamy tang.
If you prefer a baked-set version, whisk in the egg yolk now.
6. Fill and Set
Path A: No-Bake Filling
Spoon or pipe filling into the warm cups. Let cool 10 minutes, then chill for 30–45 minutes until firm.
Path B: Lightly Baked Filling
Spoon filling into partially baked cups, return to oven for 2–4 minutes just enough to barely set.
Cool 15 minutes, then chill for 20–30 minutes before dipping.
7. Melt and Prepare Chocolate Coating
In a microwave-safe bowl, melt chocolate in 20–30 second bursts at 50% power, stirring each time.
Once 80% melted, remove and stir until fully smooth. Add 1–2 tsp oil for a glossy, dip-ready finish.
Optional: sprinkle in a pinch of espresso powder to deepen the cocoa profile.
8. Dip and Decorate
Dip tops of chilled cookie bites into the melted chocolate, letting excess drip off.
Set them on parchment. While the coating is wet, add sea salt, crushed nuts, or sprinkles for flair.
Chill 10–15 minutes until the chocolate hardens to a shiny snap.
9. Trim and Perfect
If chocolate pools around the base, trim with a small paring knife for bakery-clean edges.
Admire those glossy domes bite-size perfection achieved!
10. Serve
Stack on a dessert stand or arrange in paper mini-cups. Alternate between plain, sprinkled, and salted for a visually stunning spread.
Serve slightly chilled or at room temperature cool enough to hold, soft enough to melt.
Pro Tips & Chef Secrets
-
Always soften dairy smooth filling is 90% temperature.
-
Chill the dough for defined cup edges.
-
Re-press wells immediately after baking; timing is key.
-
Don’t overbake they’ll crisp as they cool.
-
Powdered sugar is non-negotiable for silky cheesecake.
-
Espresso powder deepens chocolate flavor without bitterness.
-
Two-phase set (bake + chill + dip) keeps structure and sheen.
-
Thin chocolate with oil for drip-free coating.
-
Flash-freeze 5 minutes before dipping for sharp edges.
-
Sea salt enhances cocoa intensity.
-
Use a piping bag for precise, professional filling.
-
Work in batches keep un-dipped bites chilled for consistency.
Serving Suggestions
-
Perfect For: Holiday trays, tea parties, dessert tables, or edible gifts.
-
Pairings: Espresso shots, chai tea, cold milk, or vanilla latte.
-
Presentation: Use tiered dessert stands, marble platters, or gift boxes lined with gold paper. Add citrus zest curls or edible glitter for glamour.
Variations
-
Oreo Cheesecake Bites Replace part of flour with crushed Oreos; top with mini cookies.
-
Nutella Swirl Add a swirl of Nutella to the cheesecake before baking; finish with chopped hazelnuts.
-
Strawberry Heart Spoon a drop of strawberry jam in the center before chilling; drizzle white chocolate.
-
Mocha Crunch Espresso cheesecake filling topped with cacao nibs for crunch.
-
Salted Caramel Add caramel drizzle before chocolate dip; sprinkle with flaky salt.
-
No-Bake Base Skip baking; use crushed biscuits + butter pressed into mini liners.
-
Air Fryer Version Bake cups at 300°F (150°C) for 5–7 minutes; fill and chill as usual.
Recipe Summary
Plush vanilla-cheesecake tucked inside buttery cocoa cookie cups, sealed with shiny chocolate.
The chill-and-dip technique delivers clean edges, glossy tops, and balanced textures.
Ideal for gifting, storing, and stealing “just one more.”
Recipe Notes
-
Storage: Refrigerate airtight for up to 5 days.
-
Freezing: Freeze (dipped or undipped) up to 1 month; thaw in fridge.
-
Reheating: Not required best served chilled or room temp.
-
Substitutions: Greek yogurt ⇄ sour cream; Dutch cocoa ⇄ natural cocoa; coconut oil ⇄ neutral oil.
-
Scaling: Double dough for larger batches.
-
Make-Ahead Tip: Bake cookie cups one day; fill and dip next day for stress-free prep.
-
Allergy Notes: Contains dairy, gluten, egg. Use GF flour and dairy-free cream cheese for alternatives.
Nutrition (Approx. per Bite)
| Calories | Fat | Carbs | Protein |
|---|---|---|---|
| 180 kcal | 11 g | 18 g | 3 g |
Conclusion
There’s a reason bite-size desserts have become a global obsession they’re comforting, elegant, and perfectly portioned for happiness. Choco Cheesecake Cookie Bites capture everything a dessert should be: the aroma of cocoa, the creaminess of cheesecake, and the snap of chocolate that completes the experience.
They’re easy to master, endlessly adaptable, and always leave people asking, Can I take one more?
So grab your whisk, soften that cream cheese, and bake up a tray of bliss one bite at a time.
Choco Cheesecake Cookie Bites Bite of Pure Bliss
Ingredients
Method
- Bring Dairy to Room Temperature
- Set cream cheese, butter, and egg out for 30–60 minutes. Soft ingredients blend seamlessly no lumps, no curdling, just silky smoothness.
- Make the Cocoa Cookie Dough
- Cream together butter, granulated sugar, and brown sugar until light and fluffy (2–3 minutes). This aerates the dough and builds structure.
- Add egg and vanilla, beating until fully incorporated.
- In another bowl, whisk flour, cocoa powder, baking powder, baking soda, and salt.
- Gradually combine dry with wet just until the flour disappears. The dough should be soft but not sticky.
- Chill for 20–30 minutes for crisp edges and controlled spread.
- Form the Cookie Cups
- Preheat oven to 350°F (175°C).
- Grease or butter a mini muffin pan. Scoop 1 tablespoon of dough per cup and press it to form a shell, leaving a small cavity in the center.
- A mini tart press or the back of a teaspoon works great.
- First Bake The “Low Fry” Moment
- Bake for 8–10 minutes, just until the edges are set and tops look matte.
- Immediately re-press the centers gently (use a spoon or tamper) to maintain the cup shape — this prevents shallow wells later.
- Let cool slightly while you make the filling.
- Make the Cheesecake Filling
- In a clean bowl, beat cream cheese until fluffy. Add powdered sugar and continue beating until smooth.
- Blend in sour cream (or yogurt) and vanilla extract for that creamy tang.
- If you prefer a baked-set version, whisk in the egg yolk now.
- Fill and Set
- Path A: No-Bake Filling
- Spoon or pipe filling into the warm cups. Let cool 10 minutes, then chill for 30–45 minutes until firm.
- Path B: Lightly Baked Filling
- Spoon filling into partially baked cups, return to oven for 2–4 minutes just enough to barely set.
- Cool 15 minutes, then chill for 20–30 minutes before dipping.
- Melt and Prepare Chocolate Coating
- In a microwave-safe bowl, melt chocolate in 20–30 second bursts at 50% power, stirring each time.
- Once 80% melted, remove and stir until fully smooth. Add 1–2 tsp oil for a glossy, dip-ready finish.
- Optional: sprinkle in a pinch of espresso powder to deepen the cocoa profile.
- Dip and Decorate
- Dip tops of chilled cookie bites into the melted chocolate, letting excess drip off.
- Set them on parchment. While the coating is wet, add sea salt, crushed nuts, or sprinkles for flair.
- Chill 10–15 minutes until the chocolate hardens to a shiny snap.
- Trim and Perfect
- If chocolate pools around the base, trim with a small paring knife for bakery-clean edges.
- Admire those glossy domes bite-size perfection achieved!
- Serve
- Stack on a dessert stand or arrange in paper mini-cups. Alternate between plain, sprinkled, and salted for a visually stunning spread.
- Serve slightly chilled or at room temperature cool enough to hold, soft enough to melt.
Notes
- Storage: Refrigerate airtight for up to 5 days.
- Freezing: Freeze (dipped or undipped) up to 1 month; thaw in fridge.
- Reheating: Not required best served chilled or room temp.
- Substitutions: Greek yogurt ⇄ sour cream; Dutch cocoa ⇄ natural cocoa; coconut oil ⇄ neutral oil.
- Scaling: Double dough for larger batches.
- Make-Ahead Tip: Bake cookie cups one day; fill and dip next day for stress-free prep.
- Allergy Notes: Contains dairy, gluten, egg. Use GF flour and dairy-free cream cheese for alternatives.