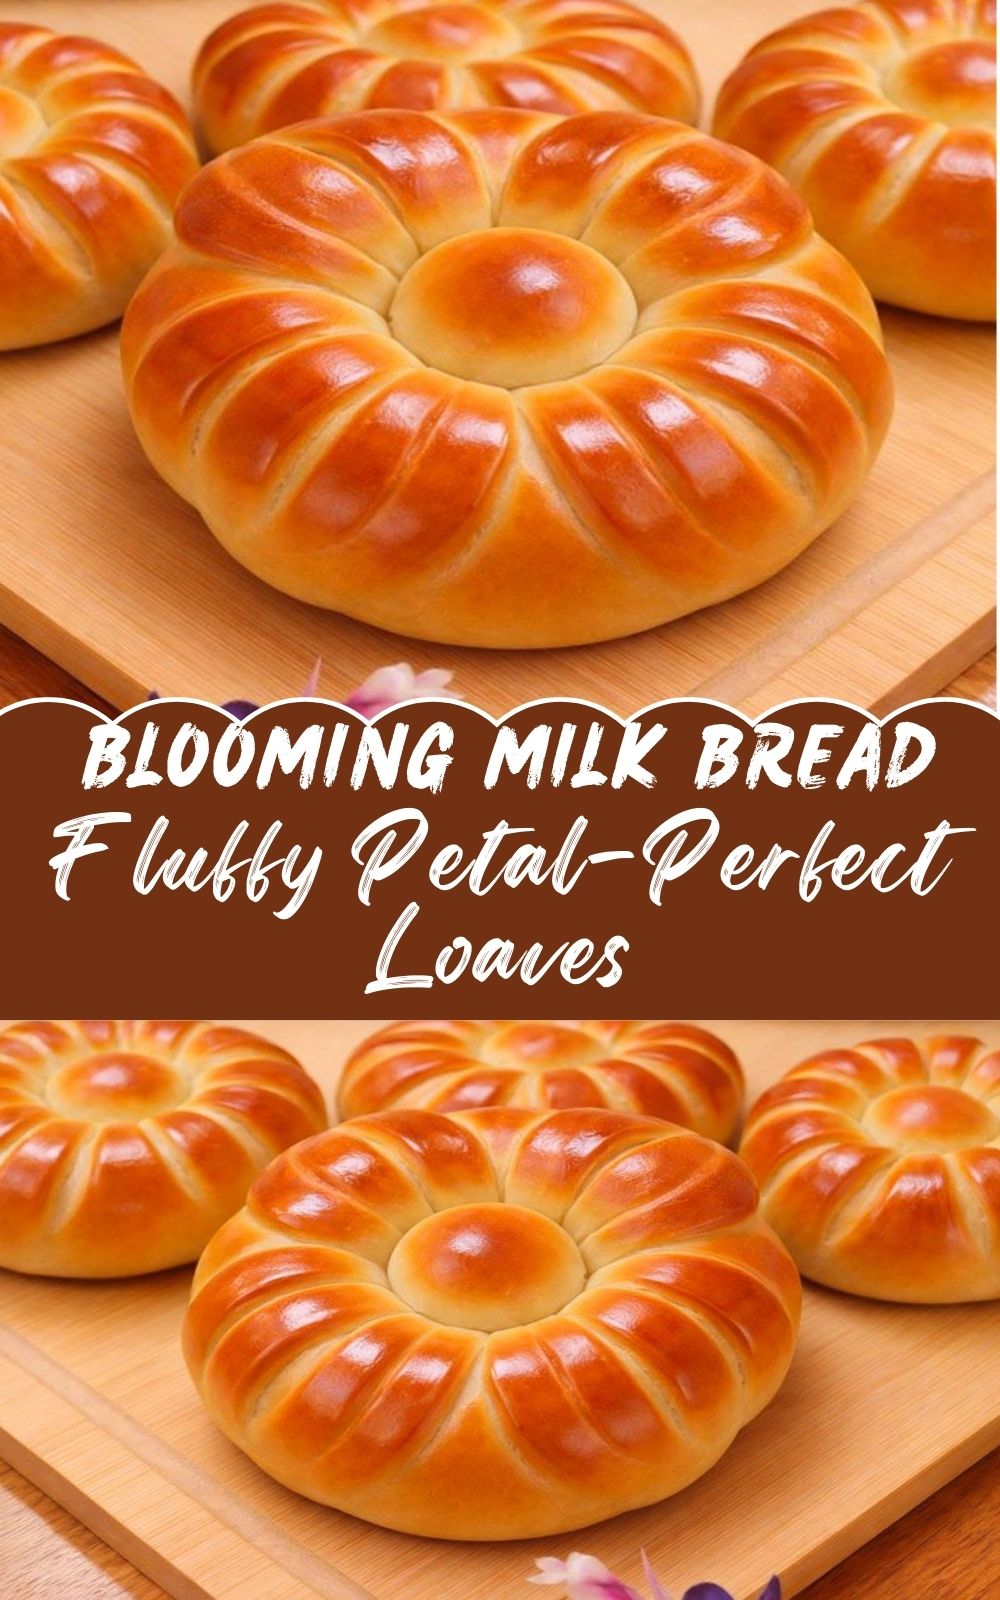
Blooming Milk Bread Fluffy Petal-Perfect Loaves
Blooming milk bread, fluffy petal-perfect loaves, is one of those desserts that feels like a small celebration without needing a reason. It starts quietly, the way the best baking often does: warm milk in a measuring cup, yeast waking up, flour waiting in a bowl like it’s ready to be turned into something softer. Milk bread has a gentleness to it, more tender than a standard dinner roll, with a subtle sweetness and a crumb that pulls apart in fine, feathery strands. The first time I made a blooming loaf, I remember thinking it looked almost too pretty to eat. Then we tore into it anyway, and the whole kitchen filled with that warm butter-and-vanilla smell that makes you want to slow down.
The shaping is what makes this bread special. Instead of a single smooth loaf, you create little “petals” that stack and fan out as the dough rises. When the oven heat hits the pan, those petals puff and separate just enough to look like a soft flower. The tops turn glossy and golden, and the edges where dough meets dough get lightly caramelised. It’s not crunchy bread, more like a tender, pillowy bake with a soft crust that yields easily under your fingers. You can hear the whisper of steam when you pull it apart, and the inside stays cloud-soft.
What I love is how it lands between bread and dessert. It’s sweet, but not cake-sweet. It’s buttery and comforting, but still light enough to eat with coffee in the afternoon or serve as a warm ending to dinner. Blooming milk bread, fluffy petal-perfect loaves give you that cosy pull-apart moment one petal at a time, like the kind of treat you’d find in a bakery window, only better because you made it at home and it’s still warm.
Why You’ll Love This Dessert
-
Soft, fluffy milk-bread texture that stays tender for days.
-
The blooming “petal” shape makes it feel special without fancy tools.
-
Gentle sweetness is perfect with tea, coffee, or warm milk.
-
Pull-apart style is great for sharing at the table.
-
Beautiful for brunch, holidays, or a simple weekend bake.
-
The aroma (butter, vanilla, warm bread) is pure comfort.
-
You can keep it simple or add cinnamon sugar for a dessert twist.
-
Make-ahead friendly with an overnight rise option.
-
Freezes well, so you can save a few petals for later.
-
The dough is forgiving once you learn the feel of it.
Ingredients with Notes
For the milk bread dough
-
3 1/4 cups (390 g) bread flour or all-purpose flour (bread flour gives a slightly more elastic, fluffy crumb)
-
2 1/4 teaspoons instant yeast (or active dry; see notes below)
-
1/3 cup (65 g) granulated sugar (gentle sweetness)
-
1 teaspoon fine salt (balances flavor)
-
3/4 cup warm whole milk (warm, not hot, comfortable to touch)
-
1 large egg, room temperature (structure + tenderness)
-
4 tablespoons unsalted butter, softened (room temp butter blends smoothly)
-
1 teaspoon vanilla extract (optional, but lovely for dessert-style aroma)
For brushing and finishing
-
1 egg + 1 tablespoon milk (egg wash for golden, glossy tops)
-
2 tablespoons melted butter (brushing after baking keeps it soft)
-
Optional: 2 tablespoons sugar mixed with 1 teaspoon cinnamon (for a sweet swirl)
-
Optional: powdered sugar for a light dusting
Method
-
Warm the milk until it feels comfortably warm, not hot. If it’s too hot, it can weaken the yeast.
-
In a large bowl, whisk flour, yeast, sugar, and salt so everything is evenly distributed.
-
Add warm milk, egg, and vanilla (if using). Stir until a shaggy dough forms.
-
Add softened butter and knead until smooth and elastic, about 8-10 minutes by hand or 6–7 minutes with a mixer. The dough should feel soft and slightly tacky.
-
Place dough in a lightly greased bowl, cover, and let rise until doubled, about 60–90 minutes. It should look puffy and spring back slowly when pressed.
-
Punch down gently and turn the dough onto a lightly floured surface. Divide into 12–16 equal pieces, depending on how “petal-full” you want the loaf.
-
Roll each piece into a small ball, then flatten into a thin oval. If using cinnamon sugar, brush lightly with melted butter and sprinkle a little before stacking or shaping.
-
Stack 4–5 ovals (lightly buttered between layers if you want extra tenderness), then cut the stack into wedges like pizza slices. Each wedge becomes a cluster of petals.
-
Stand the wedges upright in a greased round pan or loaf pan, arranging them so the cut edges face up and “bloom” as they rise. Leave a little space; they’ll expand.
-
Cover and let rise again for 30–45 minutes, until the dough looks airy and slightly puffy.
-
Preheat oven to 350°F. Brush gently with egg wash so the tops bake up golden and glossy.
-
Bake 25-30 minutes, until the top is deep golden and the loaf sounds slightly hollow when tapped. Brush with melted butter after baking, cool 10–15 minutes, then pull apart and serve warm.
Sweetness and Texture Tips
Milk bread should feel tender and soft, not dry. The biggest secret is the dough texture: keep it slightly tacky after kneading. If you add too much flour while kneading, the crumb turns tighter and drier. Dust lightly, but trust the dough to become smooth as you knead.
For a sweeter dessert feel, add a cinnamon-sugar layer or brush petals with melted butter and sprinkle sugar between stacks. For less sweetness, keep the dough plain and let the vanilla and butter carry the flavor.
Don’t rush the rise. A full first rise gives you that fluffy, feathery crumb. If your kitchen is cool, give it extra time rather than pushing heat. Slow rising builds softness.
To avoid overbaking, check at 25 minutes. Milk bread darkens quickly near the end. If the top is browning fast, tent loosely with foil for the last 5–7 minutes so the center finishes without drying.
Serving and Plating Ideas
Serve warm petals as-is with coffee, tea, or hot cocoa. For a dessert plate, add a spoonful of strawberry jam or honey on the side, simple, not fussy.
If you want a more “bakery” presentation, dust lightly with powdered sugar right before serving. For brunch, pair with fruit salad and yogurt. For a cozy evening dessert, serve with a small scoop of vanilla ice cream and let it melt into the warm bread.
This bread is also lovely as a sharing centerpiece. Put it in the middle of the table, and let people pull off petals with their fingers. It creates a calm, communal moment without needing anything dramatic.
Storage and Make-Ahead Notes
Store leftovers in an airtight container at room temperature for up to 2 days, or refrigerate for up to 4 days. Reheat gently in a 300°F oven for 6–8 minutes to bring back softness.
For make-ahead, you can refrigerate the dough after the first rise overnight. The next day, let it sit at room temperature for 20–30 minutes, shape, rise, and bake. This can even improve flavor.
To freeze, wrap cooled bread tightly and freeze up to 2 months. Thaw at room temperature, then warm in the oven. Freezing works best for keeping texture soft, especially if you reheat gently and brush with a little melted butter afterward.
Recipe Notes
If the loaf is dense, it likely didn’t rise long enough, or the dough was too dry. Give the dough time and keep it soft during kneading. If the petals don’t “bloom,” the wedges may have been placed too tightly or the second rise was short. Leave a bit of space and let them puff before baking.
If the top browns too quickly, tent with foil near the end. Milk and sugar encourage browning, so ovens that run hot can color the crust fast.
For substitutions: you can use active dry yeast (proof it in warm milk for 5-10 minutes first). You can add orange zest for a bright bakery note, or swap vanilla for almond extract for a different sweetness.
Dairy-free is possible with plant milk and plant butter, though the flavor shifts slightly, and the crumb may be a touch less rich. Gluten-free milk bread is more challenging; if you attempt it, use a gluten-free bread flour blend made for yeast dough and keep expectations realistic.
Recipe Time and Details
Prep Time: 30 minutes
Cook Time: 28 minutes
Total Time: About 2 hours 30 minutes
Servings: 10–12 petals (about 8 servings)
Calories: Approx. 240 per serving
Courses: Dessert
Cuisines: American (Home Baking)
Diets: Vegetarian
FAQs
1) Can I make blooming milk bread fluffy petal-perfect loaves without bread flour?
Yes. All-purpose flour works well, especially if you knead until the dough is smooth and elastic. Bread flour gives a slightly chewier structure and taller rise, but the bread will still be soft with all-purpose flour. Just avoid adding too much extra flour while kneading.
2) Why is my dough sticky, and should I add more flour?
Milk bread dough is meant to feel soft and a bit tacky. If it’s very wet and unworkable, add flour a tablespoon at a time. But if it’s only slightly sticky, keep kneading. Over-flouring is a common reason milk bread turns dense or dry instead of fluffy.
3) How do I get the petals to bloom instead of baking into a solid loaf?
Shape the stacks cleanly, stand wedges upright, and leave a little space between clusters. Also, give the second rise enough time so the dough looks puffy before baking. If everything is packed too tightly and under-proofed, the petals won’t separate and “fan out” as much.
4) Can I make this bread sweeter like a true dessert?
Yes. Add cinnamon sugar between the stacked ovals or brush layers with melted butter and a light sprinkle of sugar. You can also finish with powdered sugar or a thin vanilla glaze. Keep sweetness gentle; milk bread tastes best when it’s softly sweet rather than overly sugary.
5) What’s the best pan to use for a blooming loaf?
A 9-inch round cake pan or springform pan works well, as does a loaf pan for a taller, tighter bloom. Round pans give a more floral look. Grease the pan well, and if you want easy release, line the bottom with parchment. Choose a deeper pan for more dramatic petals.
6) Can I do the first rise in the fridge overnight?
Yes, and it’s a great make-ahead option. After the first rise begins or even right after mixing, refrigerate the dough covered overnight. The next day, let it sit at room temperature until pliable, shape, rise again, and bake. The flavor often improves with the slow rise.
7) Why did my bread brown too quickly on top?
Milk and sugar promote browning, and some ovens run hot. If the top is golden early but the center needs more time, tent loosely with foil for the last 5-10 minutes. This protects the top while the inside finishes baking and stays tender.
8) How do I keep the bread soft the next day?
Store it tightly covered so it doesn’t dry out. Reheat gently in a 300°F oven for a few minutes, then brush with a little melted butter. That small step brings back the tender, pillowy feel and refreshes the aroma like it’s just baked.
9) Can I freeze this bread, and will it still taste good?
Yes. Freeze fully cooled bread wrapped tightly. Thaw at room temperature and warm gently in the oven. Milk bread freezes well because of the butter and milk, which help keep the crumb soft. A quick brush of melted butter after reheating makes it taste freshly baked.
10) What if I don’t want to use egg wash?
You can brush with milk or cream instead. Egg wash gives the deepest glossy golden color, but milk still helps browning and keeps the crust soft. If you skip brushing entirely, the bread will be paler and slightly drier on top, but still tender inside.
Conclusion
If you’re looking for a dessert that feels warm, soft, and quietly impressive, blooming milk bread, fluffy petal-perfect loaves are a beautiful one to try. The dough is gentle, the shaping is soothing once you get into it, and the final loaf invites sharing, most simply one petal pulled off at a time. Serve it warm with coffee, tea, or a little jam, and let it be the kind of bake that makes your kitchen feel calmer. It’s not a dramatic dessert, and that’s exactly why it’s so good: tender crumb, golden tops, and a buttery sweetness that tastes like home.

Blooming Milk Bread Fluffy Petal-Perfect Loaves
Ingredients
Method
- Warm the milk until it feels comfortably warm, not hot. If it’s too hot, it can weaken the yeast.
- In a large bowl, whisk flour, yeast, sugar, and salt so everything is evenly distributed.
- Add warm milk, egg, and vanilla (if using). Stir until a shaggy dough forms.
- Add softened butter and knead until smooth and elastic—about 8–10 minutes by hand or 6–7 minutes with a mixer. The dough should feel soft and slightly tacky.
- Place dough in a lightly greased bowl, cover, and let rise until doubled, about 60–90 minutes. It should look puffy and spring back slowly when pressed.
- Punch down gently and turn dough onto a lightly floured surface. Divide into 12–16 equal pieces, depending on how “petal-full” you want the loaf.
- Roll each piece into a small ball, then flatten into a thin oval. If using cinnamon sugar, brush lightly with melted butter and sprinkle a little before stacking or shaping.
- Stack 4–5 ovals (lightly buttered between layers if you want extra tenderness), then cut the stack into wedges like pizza slices. Each wedge becomes a cluster of petals.
- Stand the wedges upright in a greased round pan or loaf pan, arranging them so the cut edges face up and “bloom” as they rise. Leave a little space; they’ll expand.
- Cover and let rise again for 30–45 minutes, until the dough looks airy and slightly puffy.
- Preheat oven to 350°F. Brush gently with egg wash so the tops bake up golden and glossy.
- Bake 25–30 minutes, until the top is deep golden and the loaf sounds slightly hollow when tapped. Brush with melted butter after baking, cool 10–15 minutes, then pull apart and serve warm.
Notes