
Best Sticky Honey Chicken Wings – Sweet, Sticky & Totally Addictive Game-Day Snack
There’s something irresistibly comforting about a platter of sticky honey chicken wings. They’re the ultimate finger food sweet, savory, sticky, and gloriously messy in the best possible way. The kind of dish that brings people together around a table, chatting, laughing, and licking their fingers clean. Whether you’re hosting a Super Bowl party, throwing a backyard barbecue, or just craving a restaurant-quality snack at home, these wings are the answer.
I still remember the first time I made these wings for a family game night. The aroma of caramelizing honey and smoky BBQ sauce filled the kitchen, and by the time I set the platter down, they were gone in minutes. Since then, they’ve become a family tradition and now, they’re about to become one of yours too.
The beauty of this recipe lies not just in how delicious the wings are but also in how simple they are to make. No complicated steps, no hard-to-find ingredients, and no need for deep-frying. Instead, we focus on technique proper preparation, careful seasoning, and a luscious honey-BBQ glaze that turns into a glossy coating you’ll dream about for days.
Why You’ll Love This Recipe
-
Sweet, sticky perfection: Each bite delivers the perfect balance of honey sweetness and smoky BBQ depth, with a hint of spice for excitement.
-
Crispy on the outside, juicy inside: Smart drying and oven-roasting techniques give you crisp, golden skin without sacrificing tenderness.
-
Game-day ready: Make a big batch, toss them in sauce, and watch them disappear. They’re always the first thing to go at parties.
-
Customizable: Go hotter, sweeter, tangier, or even air-fry them this recipe adapts to your taste and equipment.
What Makes It Special & Healthier
-
Baked, not fried: These wings achieve crispiness in the oven saving you from greasy splatter and cutting down on unnecessary oil.
-
Real, wholesome glaze: The sauce is made from honey, butter, BBQ sauce, and spices no bottled shortcuts or corn-syrup-heavy mixes.
-
Protein-packed: Chicken wings are a great source of lean protein, especially when baked, and they pair perfectly with veggie sides for a balanced meal.

Behind the Sauce: A Quick History of Honey-Glazed Wings
Honey-glazed chicken wings might feel like a modern invention, but the idea of pairing sweet and savory has deep culinary roots. Across cultures, honey has been used for centuries to balance saltiness, enhance umami, and create that irresistible sticky texture.
In the United States, the honey-BBQ wing rose to fame alongside the sports-bar boom of the 1980s and 1990s, when Buffalo wings were king. Restaurants soon started experimenting with glazes beyond the classic hot sauce and sweet, smoky honey BBQ quickly became a fan favorite. Today, it’s a staple on menus across the country and a must-make recipe for home cooks who love big, bold flavor with minimal effort.
Ingredients
Here’s what you’ll need to create 4 servings (about 16-20 wings):
Chicken
-
1.5 kg (3 lb 8 oz) chicken wings (split into drums and flats)
Optional Cleaning Mixture
-
½ cup (120 ml) cold water
-
½ cup (120 ml) white vinegar
-
Juice of ½ lemon
Seasoning Blend
-
1½ tsp (4.5 g) salt
-
1½ tsp (4.5 g) black pepper
-
1½ tsp (4.5 g) chili powder
-
1½ tsp (4.5 g) smoked paprika
-
1½ tsp (4.5 g) garlic powder
Sticky Honey Glaze
-
¼ cup (57 g) unsalted butter
-
1 cup (240 g) BBQ sauce (smoky or sweet)
-
½ cup (170 g) honey
-
2 Tbsp (30 g) ketchup
Optional Extras
-
1 tsp (3 g) cayenne pepper for heat
-
Fresh parsley or cilantro for garnish
-
Sesame seeds for presentation
-
Lemon wedges for serving
Substitutions:
-
Use maple syrup for a deeper, earthy sweetness.
-
Swap smoked paprika for chipotle powder if you prefer a spicy-smoky kick.
-
Try agave nectar for a lighter glaze.
Instructions / Method
Step 1: Wash and Prep (Optional but Recommended)
While optional, washing the wings with a mix of water, vinegar, and lemon juice helps remove impurities and tenderize the skin. Soak for 20-30 minutes, then rinse and pat dry very thoroughly.
Step 2: Dry for Crispy Skin
This is one of the most important steps. Lay the wings on a wire rack set over a baking sheet and refrigerate uncovered for 1-3 hours. This removes surface moisture and ensures they crisp beautifully in the oven.
Step 3: Season Generously
Preheat your oven to 425 °F (220 °C). Toss the wings in your seasoning blend, coating them evenly. Layer them on a wire rack in a single layer with space between each piece.
Step 4: Bake Until Golden and Crisp
Bake for 20 minutes, then flip the wings and bake for another 20-25 minutes. The skin should be golden brown and slightly blistered.
Step 5: Make the Sticky Glaze
While the wings bake, melt the butter in a saucepan over medium heat. Stir in the BBQ sauce, honey, and ketchup. Simmer for 10-12 minutes until slightly thickened and glossy.
Step 6: Glaze and Caramelize
Once the wings are fully baked, toss them in the glaze until thoroughly coated. Return them to the oven for 7-8 minutes to set the glaze. The sugars will caramelize slightly, creating that sticky, finger-licking surface.
Step 7: Final Touches & Plating
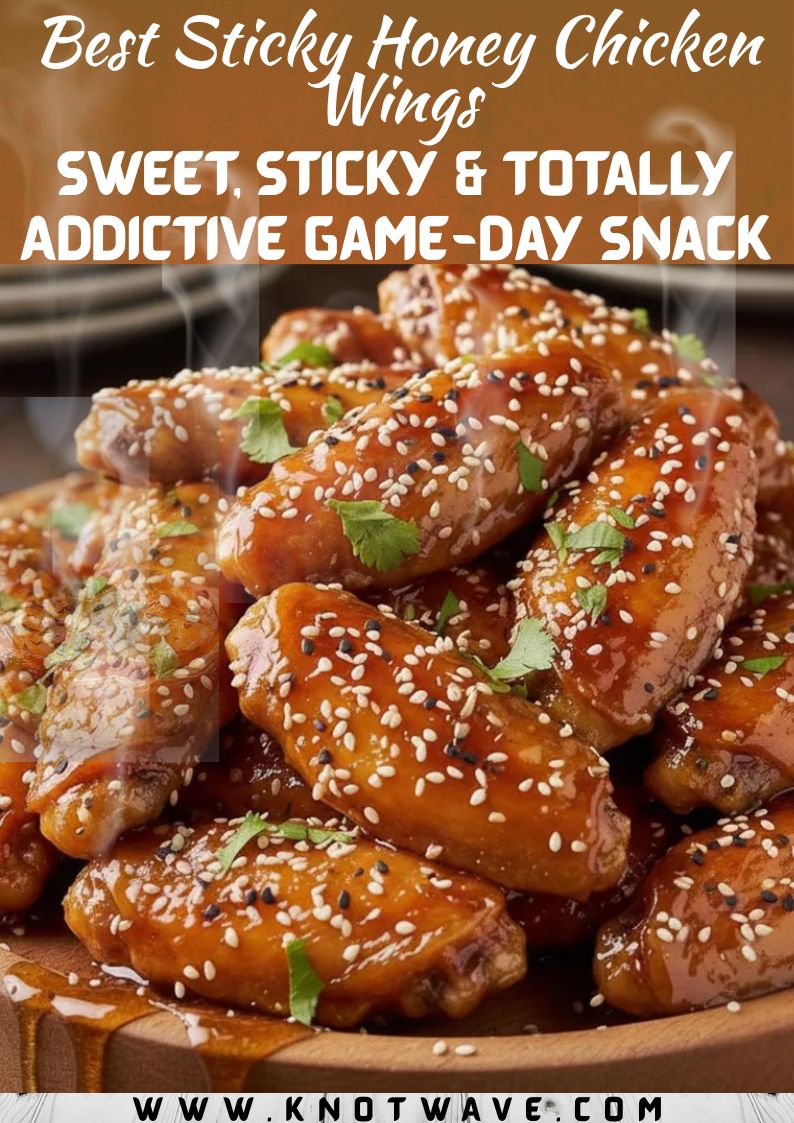
Let the wings rest for 5 minutes before serving. Garnish with fresh herbs and sesame seeds, and serve with lemon wedges or your favorite dipping sauces.
Recipe Information Box
| Item | Details |
|---|---|
| Prep Time | 20 min (+1-3 hr drying) |
| Cook Time | 45-50 min |
| Total Time | 1 hr 15 min |
| Servings | 4 |
| Cuisine | American / BBQ / Fusion |
Pro Cooking Science : Why This Method Works
-
Drying the wings removes surface moisture, allowing fat under the skin to render out. This is what makes the skin crispy instead of rubbery.
-
High-temperature roasting caramelizes natural sugars and crisps up skin faster than lower temperatures.
-
Double cooking (bake + glaze bake) sets the sauce and thickens the coating into a sticky, clingy layer that doesn’t slide off.
-
Resting allows juices to redistribute inside the meat, preventing dryness.
Notes & Tips
Variations
-
Spicy Fire Wings: Add 2 tbsp hot sauce to the glaze and dust wings with cayenne.
-
Asian-Inspired: Replace BBQ sauce with soy sauce + hoisin + rice vinegar.
-
Grilled Version: Grill over medium-high heat, brushing with glaze during the last 5 minutes.
Substitutions
-
Chicken drumsticks or thighs work too just bake longer (50-60 min).
-
Butter can be replaced with olive oil for a dairy-free version.
-
Use a sugar-free BBQ sauce to reduce carbs.
Make-Ahead & Storage
-
Season and refrigerate overnight for deeper flavor.
-
Store leftovers in an airtight container for 3-4 days.
-
Reheat in a 400 °F (200 °C) oven for 6-8 minutes or air fryer for 4-5 minutes.
Troubleshooting & Mistakes
-
Soggy Wings? You didn’t dry them enough or overcrowded the pan.
-
Sauce Too Runny? Simmer longer to thicken.
-
Glaze Burned? Keep oven temp under 430 °F and watch closely during final bake.
Tools & Equipment
-
Wire rack & sheet pan
-
Meat thermometer (internal temp: 165 °F / 74 °C)
-
Saucepan & whisk
-
Tongs and basting brush
Serving Ideas
-
Serve with ranch, blue cheese, or garlic aioli.
-
Pair with coleslaw, fries, mac and cheese, or cornbread.
-
For parties, offer different sauces (honey mustard, sriracha mayo, creamy dill).
Flavor Pairing Tips
-
Beer: A crisp lager or honey ale complements the sweetness.
-
Cocktails: Bourbon lemonade or whiskey sour adds depth.
-
Non-alcoholic: Sparkling lemonade or iced tea cuts through the richness.
Common Mistakes Beginners Make
-
Skipping the drying step: This is the #1 reason wings come out soggy.
-
Overcrowding the tray: Leads to steaming, not roasting. Space them out.
-
Not flipping halfway: Results in uneven crispiness.
-
Glazing too early: Sugar burns before the wings finish cooking.
Chef’s Pro Secrets
-
Use a fan-assisted oven if possible it helps the skin dry and crisp faster.
-
Double glaze for restaurant-style results: Glaze, bake, then glaze again and broil for 2 minutes.
-
Add acidity: A splash of apple cider vinegar or lemon juice in the glaze balances the sweetness.
-
Use a resting rack: After baking, place wings on a rack (not a plate) so steam doesn’t soften the crust.
Nutritional Information (Per Serving)
-
Calories: 520
-
Protein: 34 g
-
Carbs: 38 g
-
Fat: 28 g
-
Fiber: 2 g
-
Sodium: 780 mg
Summary
These sticky honey chicken wings are everything you want in a comfort-food classic: sweet, sticky, crispy, juicy, and deeply satisfying. They’re simple enough for a weeknight and impressive enough for a party spread. Once you make them, they’ll become a permanent part of your rotation guaranteed.
Conclusion
Now that you have all the secrets to perfect sticky honey chicken wings, it’s time to put them into action. Fire up that oven, grab some napkins, and prepare for the best wings you’ve ever tasted. Don’t forget to leave a comment with your favorite variations or tag me when you share your wing platter online I love seeing your creations!
Best Sticky Honey Chicken Wings – Sweet, Sticky & Totally Addictive Game-Day Snack
Ingredients
Method
- Instructions
- Clean & Prep the Wings (Optional but Recommended)
- Mix water, vinegar, and lemon juice in a bowl. Soak wings for 20-30 minutes, rinse, and pat completely dry with paper towels.
- For maximum crispiness, air-dry on a rack in the fridge uncovered for 1-3 hours.
- Preheat & Season
- Preheat oven to 425 °F (220 °C).
- In a bowl, combine salt, pepper, chili powder, paprika, and garlic powder. Toss wings thoroughly to coat.
- Bake the Wings
- Arrange wings on a wire rack over a baking sheet in a single layer.
- Bake for 20 minutes, then flip and bake another 20-25 minutes until golden and crisp.
- Prepare the Honey Glaze
- While wings bake, melt butter in a saucepan over medium heat.
- Stir in BBQ sauce, honey, and ketchup. Simmer gently for 10-12 minutes until thickened and glossy.
- Glaze & Caramelize
- Remove baked wings and toss in the warm glaze until well coated.
- Return wings to the oven for 7-8 minutes to set and caramelize the sauce.
- For extra stickiness, brush on a second coat and broil for 1-2 minutes (optional).
- Serve
- Rest for 5 minutes before serving.
- Garnish with fresh herbs, sesame seeds, and lemon wedges. Serve hot with ranch, blue cheese, or your favorite dip.
Notes
Pro Tips for Perfect Wings
- Dry thoroughly: Moisture is the #1 enemy of crispiness. Always pat the wings completely dry and, if possible, leave them uncovered in the refrigerator for 1-3 hours to air-dry before baking.
- Use a wire rack: Elevating the wings on a wire rack instead of placing them directly on a baking sheet lets hot air circulate, ensuring even cooking and a crispier finish.
- Glaze at the right time: Add the honey glaze near the end of baking so it caramelizes without burning. Adding it too early will make the sugars burn before the wings are cooked.
- Double-coat for shine: For a professional, restaurant-style finish, toss wings in sauce twice once before the final bake and once again right before serving.
Variations to Try
- Spicy Honey Wings: Add 1-2 tablespoons of hot sauce or ½ teaspoon cayenne to the glaze for a fiery kick.
- Asian-Inspired Glaze: Swap BBQ sauce for a mix of soy sauce, hoisin sauce, rice vinegar, and ginger for a sticky Asian-style wing.
- Smoky Maple Twist: Use maple syrup instead of honey and add a dash of liquid smoke for a deeper, more complex flavor.
- Grilled Version: Instead of baking, grill the wings over medium-high heat. Brush with glaze during the last 5 minutes for a smoky char.
Substitutions
- Protein: You can use chicken drumsticks or thighs with this recipe just increase baking time by 10-15 minutes.
- Sweetener: Replace honey with maple syrup or agave nectar if desired.
- BBQ Sauce: Use your favorite store-bought sauce, or make a homemade version with tomato paste, brown sugar, vinegar, and spices.
- Butter: Swap with olive oil for a dairy-free version.
Make-Ahead & Storage
- Prep Ahead: Season wings and refrigerate them overnight. When ready to cook, simply bake and glaze as directed.
- Refrigerate: Store leftover wings in an airtight container for up to 4 days.
- Freeze: Freeze cooked, unglazed wings for up to 2 months. Reheat in the oven, then glaze and bake for a few extra minutes.
- Reheat: Reheat in a 400 °F (200 °C) oven for 6-8 minutes or in an air fryer for 4-5 minutes for best results.
Troubleshooting & Common Mistakes
- Wings not crispy: Likely due to excess moisture. Make sure they’re dried properly and spaced out on the tray.
- Sauce too runny: Simmer the glaze longer until it thickens, or add a small amount of cornstarch slurry.
- Glaze burned: The oven was too hot or the sauce was applied too early. Always glaze during the last 7-8 minutes.
- Uneven browning: Flip the wings halfway through baking and ensure there’s enough space between them.
Tools & Equipment You’ll Need
- Wire rack + baking sheet: Essential for airflow and crispy skin.
- Meat thermometer: Ensures internal temp reaches 165 °F (74 °C).
- Saucepan: For preparing and simmering the glaze.
- Tongs & brush: For flipping wings and brushing on the glaze.
Serving Ideas
- Serve with ranch, blue cheese dressing, or garlic aioli for dipping.
- Pair with classic sides like coleslaw, mac and cheese, potato wedges, or cornbread.
- Garnish with fresh parsley, sesame seeds, or a squeeze of lemon for a restaurant-worthy presentation.
Chef’s Insider Secrets
- Add a splash of apple cider vinegar or lemon juice to the glaze to balance the sweetness of the honey.
- Sprinkle a touch of sea salt over the wings right before serving it enhances the caramelized glaze and makes the flavor pop.
- Let wings rest for 5 minutes before serving. This allows juices to redistribute and keeps the meat tender and juicy.
More Delicious Chicken Recipes You’ll Love
Looking for more mouth-watering chicken ideas? Don’t stop at wings here are some of our most popular and reader-favorite recipes you’ll love:
-
Spicy Chicken Burritos with Creamy Cheese Filling – A bold, high-protein Tex-Mex meal perfect for weeknights or meal prep.
-
Pepperoni Chicken Legs – Juicy, Cheesy & Irresistible – A pizza-inspired baked chicken dinner that’s guaranteed to impress.
-
Cheesy Garlic Chicken Wraps – Quick, satisfying, and bursting with creamy garlic flavor.
-
Savory Stuffed Stromboli with Chicken – The ultimate comfort food stuffed with tender chicken and melty cheese.
-
Crispy Dry Rub Chicken Wings – Oven-baked perfection with a crunchy finish and loads of flavor.
- Honey Chicken Wings Sweet, Sticky & Totally Addictive Game-Day Snack