Wrap It Love It Cheesy Beef Goodness in Every Bite
There’s something magical about comfort food it’s not just what we eat, it’s what we feel. The aroma of melted cheese, the sound of a crispy wrap sizzling in butter, and that first bite where everything warmth, flavor, and nostalgia meets in perfect harmony. Some recipes aren’t just cooked; they’re felt.
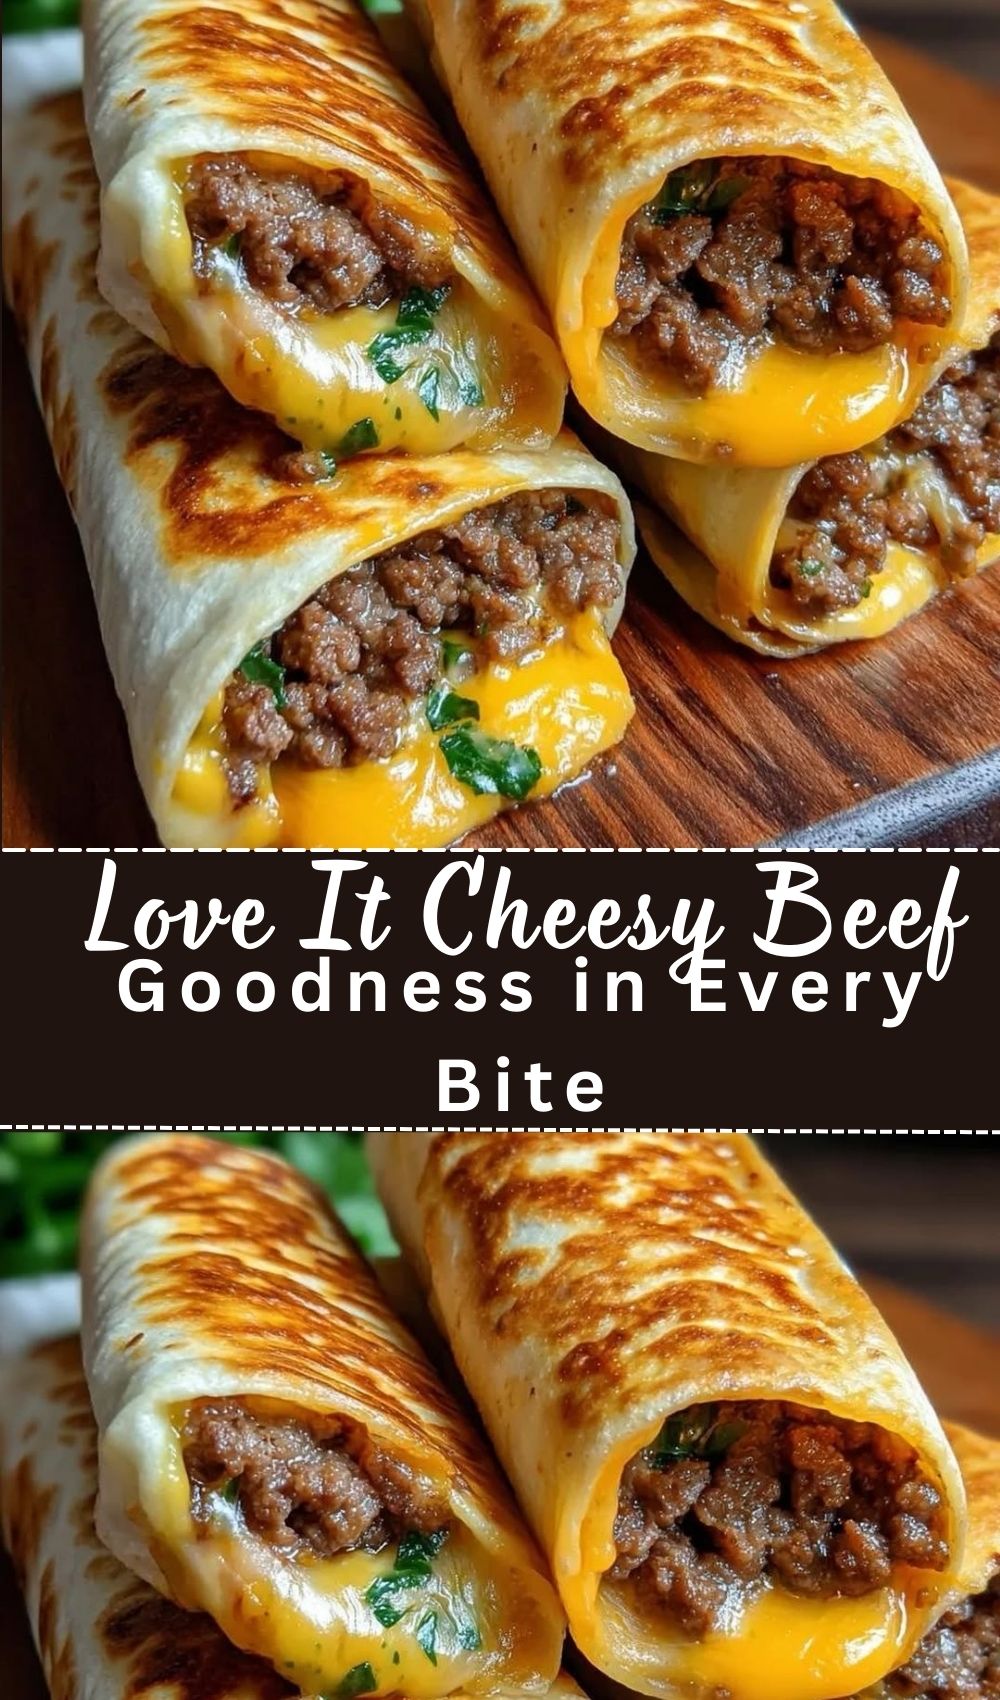
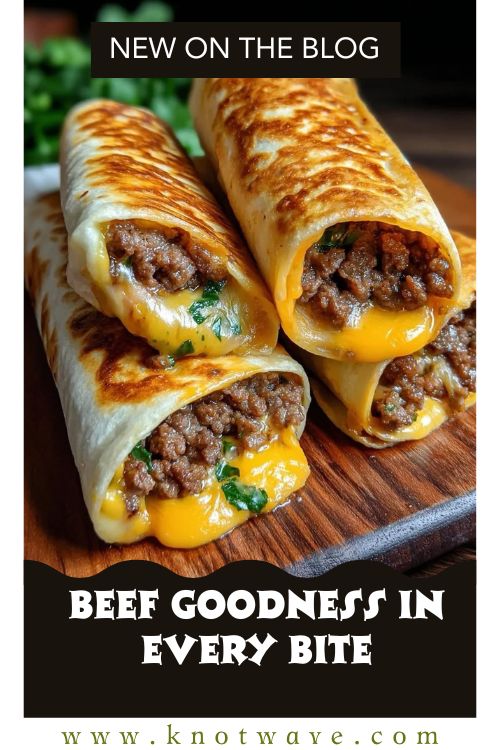
That’s what Cheesy Beef Wraps are little bundles of love wrapped in golden perfection. They remind us of cozy evenings at home, laughter echoing through the kitchen, and the simple joy of making something delicious from scratch. Each bite carries the creamy pull of cheese, the tender juiciness of marinated beef, and the satisfying crunch of a toasted tortilla comfort food elevated to a love language.
Unlike ordinary wraps, this recipe combines marinated beef that’s been infused with flavor, sautéed slowly until caramelized, and wrapped with two kinds of cheese that melt into creamy ribbons. The outside crisps beautifully, while the inside stays soft, juicy, and loaded with gooey goodness.
Background Story
The first time I had a cheesy beef wrap, it wasn’t in a fancy restaurant it was in a small corner café on a drizzly evening. The kind of place where you can smell butter and garlic from a mile away. I remember unwrapping the foil, watching the steam rise, and taking that first bite cheese stretching endlessly, beef juicy and tender, the tortilla golden and slightly crisp. It was love at first bite.
That night stayed with me. I wanted to recreate that feeling not just the taste, but the comfort, the warmth, the memory. So I started experimenting at home: marinating the beef longer, using different cheese blends, trying both pan-fried and oven-baked versions until I found the perfect balance the one that makes you close your eyes and sigh after every bite.
Now, it’s become a weekend ritual. Whenever the family gathers, this is the dish that brings everyone to the table no phones, no rush, just shared bites and happy smiles. It’s proof that love really can be wrapped and baked to perfection.
Recipe Information
| Detail | Information |
|---|---|
| Prep Time | 20 mins |
| Marination Time | 30 mins |
| Cook Time | 25 mins |
| Total Time | 1 hour 15 mins |
| Difficulty | Easy to Moderate |
| Servings | 4–6 wraps |
| Best For | Family dinner, game night, cozy weekend meal |
| Cuisine | Fusion / American-Mexican |
| Course | Main Course or Snack |
| Diet | Non-vegetarian (use soy or paneer for vegetarian option) |
Ingredients (with Notes)
Main Components
-
Ground beef (500g, lean): The heart of the dish juicy, rich, and meaty. Use lean mince to avoid excess oil.
-
Olive oil or butter (2 tbsp): Adds depth and richness when sautéing the filling.
-
Onion (1 medium, finely chopped): Adds sweetness and body to the beef mixture.
-
Garlic (4 cloves, minced): Infuses the filling with that classic homey aroma.
-
Bell peppers (optional): Add a gentle crunch and color contrast.
-
Salt, black pepper, paprika: Build the foundational flavor.
-
Soy sauce or Worcestershire sauce (1 tbsp): Brings savory umami that elevates every bite.
-
Shredded cheese (1 cup mozzarella + ½ cup cheddar): Mozzarella gives the stretch; cheddar gives the flavor kick.
-
Tortilla wraps or flatbreads (6 large): Soft yet strong enough to hold the filling and crisp up perfectly.
-
Butter (for brushing): Ensures that golden, toasty finish.
-
Fresh herbs (parsley or cilantro): Adds freshness to balance the richness.
Optional Add-Ons
-
Chili flakes or jalapeños for spice lovers.
-
BBQ sauce or ketchup adds a tangy-sweet glaze.
-
Mushroom bits for an earthy touch.
-
Cream or yogurt (1 tsp) enhances tenderness if you prefer softer texture.
Marination (Flavor-Locking Step)
The secret to unforgettable beef wraps lies in marination. Marinated beef isn’t just flavorful it becomes soft, juicy, and harmonizes with the cheese when cooked.
-
In a bowl, combine:
-
Minced beef,
-
1 tbsp soy or Worcestershire sauce,
-
½ tsp salt,
-
½ tsp black pepper,
-
1 tsp paprika,
-
1 tsp minced garlic,
-
1 tbsp olive oil,
-
and a splash of lemon juice.
-
-
Mix thoroughly and let it rest for 30 minutes at room temperature (or 1 hour in the fridge if you have time).
-
Optional: Add 1 tsp yogurt or cream for added richness and moisture retention.
Chef’s Tip: Even a short marination transforms your beef. The acid from lemon tenderizes fibers, and olive oil helps the seasoning cling, locking in juiciness through every layer of the wrap.
Step-by-Step Instructions
Step 1: Prepare the Filling
-
Heat 1 tbsp olive oil or butter in a skillet over medium heat.
-
Add onion and garlic; sauté until translucent and aromatic.
-
Stir in marinated beef and cook until browned and crumbly about 8–10 minutes.
-
Add soy/Worcestershire sauce and paprika; let it simmer so flavors deepen.
-
Optional: Add bell peppers or mushrooms for color and bite.
-
Finally, mix in a small handful of shredded cheese to bind everything into a luscious filling that clings together.
The filling should be moist but not watery. If it’s too juicy, cook a minute longer to evaporate excess moisture soggy wraps are the enemy of perfection.
Step 2: Assemble the Wraps
-
Lay out your tortillas or flatbreads on a clean surface.
-
Spoon 2–3 tablespoons of beef mixture into the center.
-
Sprinkle extra cheese over the filling this will melt into oozy pockets of joy.
-
Fold the sides inward, then roll tightly from bottom to top, tucking edges as you go.
Tip: To keep wraps sealed, brush a little butter or flour paste on the edge before rolling.
Step 3: Choose Your Cooking Style
Pan-Fried Version (Classic & Crispy)
-
Heat a nonstick pan and brush lightly with butter.
-
Place wraps seam-side down.
-
Toast each side 2–3 minutes until golden brown and crisp.
-
The cheese inside will melt beautifully, forming a gooey core.
Oven-Baked Version (Lighter & Hands-Free)
-
Preheat oven to 375°F (190°C).
-
Brush wraps with melted butter or olive oil.
-
Bake on a parchment-lined tray for 12–15 minutes until the top turns golden and edges crisp.
Air-Fried Version (Quick & Guilt-Free)
-
Spray wraps with a little oil.
-
Air fry at 180°C (356°F) for 8–10 minutes.
-
Flip halfway for even crispness.
Step 4: Rest & Slice
Remove wraps and let them rest 3–5 minutes before slicing. This allows the cheese to set slightly, making clean, café-style cuts.
Slice diagonally, and serve with dips or sauces of your choice.
Pro Tips & Chef Secrets
-
Marinate beef for at least 30 minutes flavor seeps deep and prevents dryness.
-
Drain excess fat or juice from cooked beef before wrapping.
-
Use two cheeses mozzarella for stretch, cheddar for depth.
-
Brush wraps with butter for color and that signature golden crisp.
-
Don’t overstuff! It’ll burst or become soggy.
-
Use room-temperature tortillas to prevent cracking.
-
Press gently while cooking for even browning.
-
Add sauce inside before rolling (like garlic mayo or chili dip) for extra flavor.
-
Rest after cooking melted cheese stabilizes and flavors meld.
-
Add a sprinkle of sesame seeds before baking for visual appeal and crunch.
-
Freeze assembled wraps perfect make-ahead meal idea.
-
Reheat in a pan or air fryer for that “freshly made” crispness.
Serving Suggestions
-
Serve hot with garlic mayo, cheesy dip, or spicy ketchup.
-
Add sides like coleslaw, crispy fries, or buttered corn for a full meal.
-
For a cozy presentation, serve on a wooden board with melted cheese drips.
-
Pair with mint lemonade or iced cola for balance.
-
Garnish with fresh parsley and chili flakes to add color and freshness.
Bonus Idea: Wrap each piece in foil and serve “street-style great for game nights or family movie evenings.
Variations to Try
Spicy Jalapeño Cheese Beef Wrap
Add sliced jalapeños and chili flakes for a fiery edge that pairs beautifully with melted mozzarella.
BBQ Beef Melt Wrap
Mix BBQ sauce into the beef filling and add caramelized onions smoky, sweet, and irresistible.
Creamy Mushroom Beef Wrap
Add sautéed mushrooms and a spoonful of cream for earthy, indulgent flavor.
Tex-Mex Loaded Wrap
Include beans, corn, and salsa for a colorful, hearty wrap with a festive vibe.
Vegetarian Paneer or Soy Wrap
Substitute beef with marinated paneer or soy crumbles; follow same steps for a protein-packed veggie option.
Breakfast Wrap
Add scrambled eggs with beef and cheese the perfect grab-and-go morning meal.
Recipe Summary Box
Golden, cheesy beef wraps made with marinated minced beef, creamy melted cheese, and crisp tortillas pan-fried or baked to perfection. Each bite balances crunch, creaminess, and flavorful comfort that fills your heart as much as your stomach.
Recipe Notes
-
Storage: Store leftovers in the fridge up to 3 days.
-
Reheat: Pan-toast or air fry for 5 minutes to restore crispness.
-
Freezing: Wrap in foil or cling wrap; freeze for up to 2 weeks.
-
Substitutions: Use ground chicken, turkey, or plant-based mince.
-
Scaling: Double ingredients for larger batches or family gatherings.
-
Meal Prep Tip: Make filling a day ahead; assemble wraps fresh before cooking.
Conclusion
Few things bring people together like a meal cooked with love and this Cheesy Beef Wrap captures that feeling in every bite. The blend of marinated beef, gooey cheese, and crispy tortilla creates a comforting harmony that reminds us why home-cooked food is unmatched.
So, the next time you want something hearty yet simple, wrap it up, bake it golden, and serve it warm. Feel the crunch, taste the melt, and share that joy because when food is made with care, every bite tastes like home.
Tag your cheesy creations on Instagram and let your followers know: this is not just dinner it’s Wrap It, Love It Cheesy Beef Goodness in Every Bite.
Wrap It Love It Cheesy Beef Goodness in Every Bite
Ingredients
Method
- Step 1: Prepare the Filling
- Heat 1 tbsp olive oil or butter in a skillet over medium heat.
- Add onion and garlic; sauté until translucent and aromatic.
- Stir in marinated beef and cook until browned and crumbly about 8–10 minutes.
- Add soy/Worcestershire sauce and paprika; let it simmer so flavors deepen.
- Optional: Add bell peppers or mushrooms for color and bite.
- Finally, mix in a small handful of shredded cheese to bind everything into a luscious filling that clings together.
- The filling should be moist but not watery. If it’s too juicy, cook a minute longer to evaporate excess moisture soggy wraps are the enemy of perfection.
- Step 2: Assemble the Wraps
- Lay out your tortillas or flatbreads on a clean surface.
- Spoon 2–3 tablespoons of beef mixture into the center.
- Sprinkle extra cheese over the filling this will melt into oozy pockets of joy.
- Fold the sides inward, then roll tightly from bottom to top, tucking edges as you go.
- Tip: To keep wraps sealed, brush a little butter or flour paste on the edge before rolling.
- Step 3: Choose Your Cooking Style
- Pan-Fried Version (Classic & Crispy)
- Heat a nonstick pan and brush lightly with butter.
- Place wraps seam-side down.
- Toast each side 2–3 minutes until golden brown and crisp.
- The cheese inside will melt beautifully, forming a gooey core.
- Oven-Baked Version (Lighter & Hands-Free)
- Preheat oven to 375°F (190°C).
- Brush wraps with melted butter or olive oil.
- Bake on a parchment-lined tray for 12–15 minutes until the top turns golden and edges crisp.
- Air-Fried Version (Quick & Guilt-Free)
- Spray wraps with a little oil.
- Air fry at 180°C (356°F) for 8–10 minutes.
- Flip halfway for even crispness.
- Step 4: Rest & Slice
- Remove wraps and let them rest 3–5 minutes before slicing. This allows the cheese to set slightly, making clean, café-style cuts.
- Slice diagonally, and serve with dips or sauces of your choice.
Notes
- Storage: Store leftovers in the fridge up to 3 days.
- Reheat: Pan-toast or air fry for 5 minutes to restore crispness.
- Freezing: Wrap in foil or cling wrap; freeze for up to 2 weeks.
- Substitutions: Use ground chicken, turkey, or plant-based mince.
- Scaling: Double ingredients for larger batches or family gatherings.
- Meal Prep Tip: Make filling a day ahead; assemble wraps fresh before cooking.