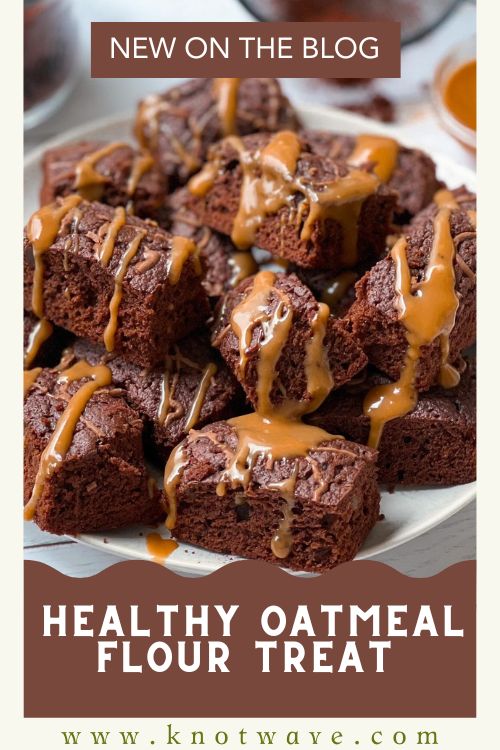
Healthy Oatmeal Flour Treat Dessert | No Added Sugar & Full of Flavor
Oatmeal has been a breakfast staple for centuries, loved for its comforting texture and nutritional richness. But did you know you can transform it into a mouth-watering Oatmeal Flour Treat Dessert that’s free of refined sugar and full of natural sweetness?
This Healthy Oatmeal Flour Treat takes humble oats and turns them into a delicious, soft-baked square that’s perfect for breakfast, snacking, or dessert time. The secret lies in using oatmeal flour, which gives these treats a delicate crumb and nutty flavor while keeping them gluten-friendly and wholesome.
Instead of refined sugar, we rely on mashed ripe bananas and soft Medjool dates to create natural sweetness. The result? A rich, aromatic treat that satisfies your sweet tooth without causing sugar spikes.
Healthy desserts have come a long way gone are the days of dry, tasteless “diet snacks.” This oatmeal-based goodie is proof that healthy baking can be just as indulgent as traditional desserts and maybe even better.
What makes it even more special is its versatility. You can enjoy it warm with a dollop of Greek yogurt, or chilled with fresh berries for a summer treat. It’s an adaptable recipe that celebrates balance wholesome ingredients, easy preparation, and maximum flavor.
Why You’ll Love This Dessert
Here are six delicious reasons you’ll fall in love with this oatmeal flour treat:
-
100% Refined-Sugar-Free
This recipe skips processed sugars entirely. The sweetness comes from ripe bananas and dates pure, natural, and full of fiber. -
Packed with Nutrients
Oatmeal flour offers slow-digesting carbs, soluble fiber, and minerals like magnesium and iron. It helps you stay full longer while nourishing your body. -
Simple, Wholesome Ingredients
Everything in this recipe is likely already in your pantry oats, eggs (or flax eggs), ripe fruit, and a touch of baking powder. No fancy additives or artificial ingredients. -
Versatile Anytime Treat
Perfect for breakfast on-the-go, post-workout snacks, or healthy dessert time. You can even pack them for kids’ lunchboxes or picnics. -
Naturally Sweet & Satisfying
Thanks to the natural sugars in fruit, every bite feels indulgent yet balanced soft, chewy, and flavorful. -
Customizable for All Diets
Easily make it gluten-free, vegan, or dairy-free with quick swaps. This recipe is flexible for all lifestyles and dietary preferences.

Ingredient List & Measurements (6 Servings)
You’ll love how simple these ingredients are nothing complicated, just wholesome kitchen basics that work together beautifully.
Dry Ingredients
-
1 ½ cups oatmeal flour (you can make it by blending rolled oats until fine)
-
1 tsp baking powder
-
½ tsp cinnamon powder (optional but adds warmth)
-
A pinch of sea salt
Wet Ingredients
-
2 medium ripe bananas, mashed (about ¾ cup)
-
3 pitted Medjool dates, softened in warm water for 10 minutes and pureed
-
2 tbsp olive oil or melted coconut oil
-
½ cup unsweetened almond milk (or any milk of choice)
-
1 large egg (or 1 flax egg for vegan version: 1 tbsp flaxseed meal + 3 tbsp water)
-
1 tsp pure vanilla extract
Optional Add-Ins
-
2 tbsp chopped walnuts or almonds
-
1 tbsp chia seeds or flax seeds for extra fiber
-
¼ cup unsweetened shredded coconut
-
A few sugar-free dark chocolate chips or raisins (optional)
Substitution Options
-
Oatmeal flour alternatives: You can use almond flour for a nuttier taste or whole-wheat flour for a heartier texture.
- Natural sweeteners: Replace bananas with ½ cup applesauce or dates with 2 tbsp pure maple syrup if not strictly sugar-free.
-
Dairy-free: Use plant-based milk (almond, soy, oat) and coconut oil instead of butter.
-
Nut-free: Skip the nuts or use seeds instead (pumpkin or sunflower).
Each variation slightly changes texture, but the end result remains moist and satisfying.
Equipment Needed
Healthy baking doesn’t require fancy tools just a few essentials:
-
Mixing bowls: For combining dry and wet ingredients separately.
-
Whisk or fork: To mash bananas and whisk the mixture until smooth.
-
Spatula: Helps fold the ingredients without overmixing.
-
Measuring cups & spoons: Accuracy ensures perfect consistency.
-
Blender or food processor: To grind oats into fine oatmeal flour.
-
Baking dish (8×8 inch) or silicone molds: Non-stick options make removal easy.
-
Oven or air fryer: Both work great! For air fryer, use silicone molds or ramekins.
-
Cooling rack: Helps your treats cool evenly and maintain structure.
A good setup ensures that each batch turns out perfectly baked golden on the edges, soft in the center.
Step-by-Step Instructions
Follow these steps carefully to achieve perfect texture and sweetness every time:
Step 1: Prepare Oatmeal Flour
If you don’t have oatmeal flour ready, make your own by blending rolled oats in a blender until finely ground. Measure after blending to get accurate proportions.
Step 2: Preheat the Oven or Air Fryer
Set your oven to 350°F (175°C) or air fryer to 320°F (160°C).
Grease your baking dish or line it with parchment paper.
Step 3: Mash the Bananas
In a large mixing bowl, mash ripe bananas using a fork until smooth and creamy. The riper the banana, the sweeter your dessert will be.
Step 4: Blend Dates for Natural Sweetness
Soak 3 dates in warm water for 10 minutes, then blend into a paste.
Add this to the mashed banana mixture this is your natural sugar base.
Step 5: Add Wet Ingredients
Whisk in egg (or flax egg), milk, oil, and vanilla extract. Stir until well combined and smooth.
Step 6: Combine Dry Ingredients
In a separate bowl, whisk together oatmeal flour, baking powder, salt, and cinnamon. This ensures even leavening and prevents clumps.
Step 7: Mix Wet and Dry
Slowly fold the dry ingredients into the wet mixture using a spatula.
Do not overmix it can make the texture dense. The batter should be thick but pourable.
Step 8: Add Optional Toppings
Fold in nuts, seeds, or chocolate chips if using. You can also reserve some to sprinkle on top before baking for a decorative look.
Step 9: Pour & Smooth
Pour the batter into your prepared baking pan. Use a spatula to smooth the top evenly.
Step 10: Bake or Air Fry
-
Oven: Bake for 25-30 minutes, or until the top is golden and a toothpick inserted in the center comes out clean.
-
Air Fryer: Bake for 18-22 minutes depending on mold size. Check halfway for doneness.
Step 11: Cool Completely
Allow to cool for at least 10–15 minutes before cutting. This helps them set properly and prevents crumbling.
Step 12: Slice & Serve
Cut into bars, squares, or bite-sized pieces. Enjoy plain or topped with fruit, nut butter, or yogurt.
Pro Tip:
If you love a slightly crisp edge, reheat your slice in an air fryer for 1 minute before serving!
Filling / Frosting / Topping Options
Healthy doesn’t mean boring here are some delicious ways to elevate your oatmeal treats:
-
Nut Butter Drizzle:
Warm 1 tbsp almond or peanut butter and drizzle over each square for richness. -
Fresh Fruit Topping:
Top with sliced bananas, strawberries, or blueberries for color and freshness. -
Yogurt or Coconut Cream:
Add a spoon of Greek yogurt or whipped coconut cream for a creamy dessert-like finish. -
Dark Chocolate Touch:
Melt sugar-free dark chocolate and drizzle lightly for a sophisticated twist. -
Crunchy Garnish:
Sprinkle crushed walnuts, chia seeds, or toasted coconut flakes on top. -
Spiced Variation:
Add nutmeg or cardamom to the batter for a cozy winter feel.
Each topping transforms the recipe try a new one each week!
Presentation & Plating Tips
Make your healthy dessert look as good as it tastes with these styling tricks:
-
Layer in glass jars: Add alternating layers of oatmeal treat chunks, yogurt, and berries great for parties or breakfast jars.
-
Use natural props: Serve on wooden trays or rustic plates for a warm, homemade aesthetic.
-
Garnish smartly: A mint leaf or a dusting of cinnamon instantly elevates presentation.
-
Photography tip: Shoot near a window with natural light. Capture the golden hue of the baked edges and drizzle shots from above for Instagram perfection.
Remember people eat with their eyes first!
Storage & Freezing Instructions
One of the best parts of this recipe is how well it stores perfect for meal prep or weekly snacks.
-
At room temperature: Store in an airtight container for up to 2 days.
-
In the refrigerator: Keeps fresh for 5-6 days. Warm slightly before serving for best texture.
-
In the freezer: Freeze in airtight bags for up to 1 month. Thaw overnight in the fridge and reheat for 15 seconds in the microwave or 1 minute in the air fryer.
Pro Tip:
Wrap individual squares in parchment before freezing. This way, you can grab one anytime you need a quick, healthy snack!
Common Mistakes & How to Fix Them
Even simple recipes can go wrong if small details are missed here’s how to avoid them:
-
Batter Too Dry:
Add 2 tbsp mashed banana or milk to loosen it up. Oat flour absorbs a lot of liquid. -
Treats Too Dense:
Overmixing can make them heavy. Mix just until ingredients combine. -
Not Sweet Enough:
Add 1 more date or 1 tbsp applesauce to naturally boost sweetness. -
Overbaking:
Keep an eye during the last 5 minutes edges should be golden, not brown. -
Crumbly Texture:
Add a tsp of oil or nut butter for extra moisture if your oats are too dry.
Master these small details, and your treats will come out perfect every single time.
Frequently Asked Questions
1. Can I make this recipe gluten-free?
Yes! Simply ensure your oats are labeled certified gluten-free. The rest of the ingredients are naturally gluten-friendly.
2. How can I make it vegan?
Replace the egg with a flax egg (1 tbsp flaxseed meal + 3 tbsp water). Use plant-based milk and coconut oil instead of butter.
3. Can I use rolled oats instead of oatmeal flour?
You can, but the texture will be chunkier and more rustic. For best results, blend your oats into fine flour.
4. What can I use instead of bananas or dates?
Applesauce or pureed sweet potatoes work beautifully. For dates, try unsweetened prune paste or a small amount of maple syrup.
5. Is this dessert suitable for diabetics?
Yes it contains no refined sugar and is high in fiber, which slows glucose absorption. Always check portion sizes if managing diabetes.
6. How long do these treats stay fresh?
They stay moist for up to 5 days refrigerated, and freeze well for longer storage.
7. Can I make this in an air fryer?
Absolutely! Air fry at 320°F (160°C) for about 20 minutes in silicone molds or ramekins the result is beautifully golden and soft.
Nutritional Information (Per Serving)
(Approximate values based on 6 servings)
| Nutrient | Amount |
|---|---|
| Calories | 190 kcal |
| Carbohydrates | 28 g |
| Protein | 4 g |
| Fat | 6 g |
| Fiber | 4 g |
| Natural Sugar | 5 g |
| Sodium | 60 mg |
This makes it a low-sugar, high-fiber dessert that supports balanced energy levels and better digestion.
Conclusion
This Healthy Oatmeal Flour Treat proves that dessert can be both indulgent and nourishing.
It’s quick to make, endlessly adaptable, and loved by kids and adults alike. Whether you bake it for meal prep, family tea time, or a clean-eating challenge, every bite brings pure comfort without the guilt.
So grab your oats and blender your kitchen is about to smell amazing!
When you try this recipe, share your creation online and tag us we’d love to see your healthy dessert magic in action.
Because healthy living doesn’t mean giving up sweetness it means finding joy in every wholesome bite.
Healthy Oatmeal Flour Treat Dessert | No Added Sugar & Full of Flavor
Ingredients
Method
- Step 1: Prepare Oatmeal Flour
- If you don’t have oatmeal flour ready, make your own by blending rolled oats in a blender until finely ground. Measure after blending to get accurate proportions.
- Step 2: Preheat the Oven or Air Fryer
- Set your oven to 350°F (175°C) or air fryer to 320°F (160°C).
- Grease your baking dish or line it with parchment paper.
- Step 3: Mash the Bananas
- In a large mixing bowl, mash ripe bananas using a fork until smooth and creamy. The riper the banana, the sweeter your dessert will be.
- Step 4: Blend Dates for Natural Sweetness
- Soak 3 dates in warm water for 10 minutes, then blend into a paste.
- Add this to the mashed banana mixture this is your natural sugar base.
- Step 5: Add Wet Ingredients
- Whisk in egg (or flax egg), milk, oil, and vanilla extract. Stir until well combined and smooth.
- Step 6: Combine Dry Ingredients
- In a separate bowl, whisk together oatmeal flour, baking powder, salt, and cinnamon. This ensures even leavening and prevents clumps.
- Step 7: Mix Wet and Dry
- Slowly fold the dry ingredients into the wet mixture using a spatula.
- Do not overmix it can make the texture dense. The batter should be thick but pourable.
- Step 8: Add Optional Toppings
- Fold in nuts, seeds, or chocolate chips if using. You can also reserve some to sprinkle on top before baking for a decorative look.
- Step 9: Pour & Smooth
- Pour the batter into your prepared baking pan. Use a spatula to smooth the top evenly.
- Step 10: Bake or Air Fry
- Oven: Bake for 25-30 minutes, or until the top is golden and a toothpick inserted in the center comes out clean.
- Air Fryer: Bake for 18-22 minutes depending on mold size. Check halfway for doneness.
- Step 11: Cool Completely
- Allow to cool for at least 10-15 minutes before cutting. This helps them set properly and prevents crumbling.
- Step 12: Slice & Serve
- Cut into bars, squares, or bite-sized pieces. Enjoy plain or topped with fruit, nut butter, or yogurt.
Notes
- Always use ripe bananas they add natural sweetness and moisture, reducing the need for any added sugar.
- Do not overmix the batter a few gentle folds are enough to keep your treats soft and fluffy.
- If your dates are too dry, soak them in warm water for 10 minutes before blending it helps create a smoother, sweeter paste.
- Texture tip: The batter should be thick but spoonable similar to muffin batter. If too dry, add a splash of milk.
- For crunch lovers: sprinkle crushed nuts or seeds on top before baking.
- Best enjoyed fresh, but these treats stay delicious for days when stored in an airtight container.
- For a cozy twist, warm them slightly and serve with a drizzle of almond butter or Greek yogurt.